This program is designed to simulate the effect of adding idle zones to a food courier delivery service.
The software is developed by the P2-Project SW2 B2-14 team.
Getting Started
To get a local copy up and running, follow these steps.
Navigate to the root folder and run npm install to install all dependencies
npm install
While in the root folder, start the server by running index.js with NodeJS
node node/index.js
The site can be visited in a browser at the address localhost:3190
http://localhost:3190/
Using the program
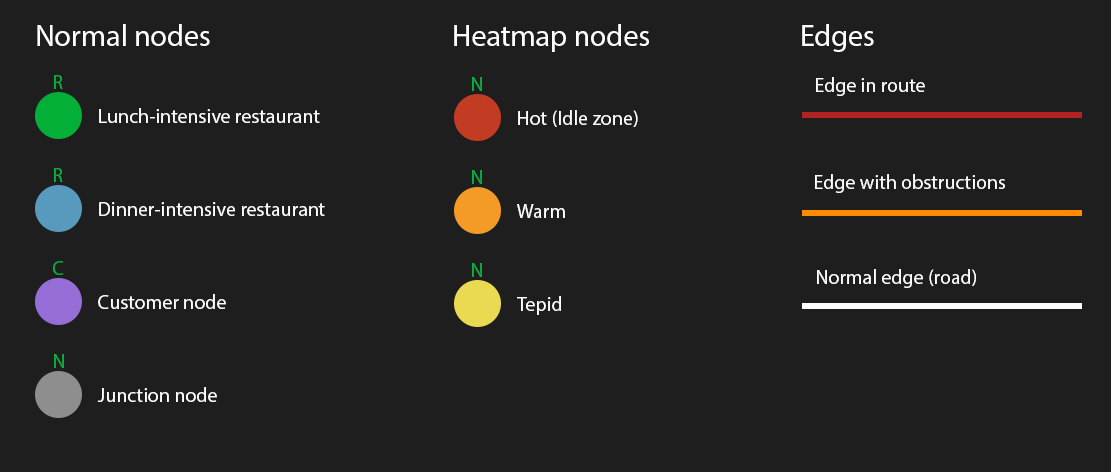
Graph visualization
In graph visualization mode, the simulation runs visually and is updated in real-time.
This mode does not provide as much in-depth statistics, but the behaviour of couriers, idle zone generation etc. can be studied closely.
Number of graphs: The amount of simulations to show and run simultaneously.
Graph size: Specifies which of the graph presets to use (see here).
Simulation algorithm: Specifies which of the shortest-path algorithms to use.
Idle zones: The maximum amount of idle zones to generate.
Order frequency: The rate at which orders are generated in each restaurant.
Ticks per second: The rate at which the simulation runs. 1 tick corresponds to one minute in simulation time.
Courier frequency: The maximum amount of couriers to generate.
Obstruction level: The number of edges to add random obstructions on (which affects the weight of an edge).
Headless simulation
In headless simulation mode, the visual aspect of the simulation is removed entirely.
This means that the simulation performs faster, and provides many useful statistics which are updated in real-time.
Graph presets (and legend)
License
Distributed under the GNU General Public License v3.0 License. See LICENSE for more information.
This program is designed to simulate the effect of adding idle zones to a food courier delivery service.
The software is developed by the P2-Project SW2 B2-14 team.
Getting Started
To get a local copy up and running, follow these steps.
Navigate to the root folder and run npm install to install all dependencies
npm install
While in the root folder, start the server by running index.js with NodeJS
node node/index.js
The site can be visited in a browser at the address localhost:3190
http://localhost:3190/
Using the program
Graph visualization
In graph visualization mode, the simulation runs visually and is updated in real-time.
This mode does not provide as much in-depth statistics, but the behaviour of couriers, idle zone generation etc. can be studied closely.
Number of graphs: The amount of simulations to show and run simultaneously.
Graph size: Specifies which of the graph presets to use (see here).
Simulation algorithm: Specifies which of the shortest-path algorithms to use.
Idle zones: The maximum amount of idle zones to generate.
Order frequency: The rate at which orders are generated in each restaurant.
Ticks per second: The rate at which the simulation runs. 1 tick corresponds to one minute in simulation time.
Courier frequency: The maximum amount of couriers to generate.
Obstruction level: The number of edges to add random obstructions on (which affects the weight of an edge).
Headless simulation
In headless simulation mode, the visual aspect of the simulation is removed entirely.
This means that the simulation performs faster, and provides many useful statistics which are updated in real-time.
Graph presets (and legend)
License
Distributed under the GNU General Public License v3.0 License. See LICENSE for more information.
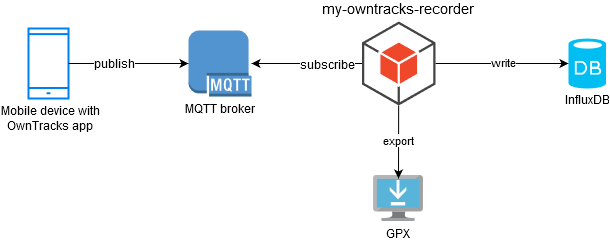
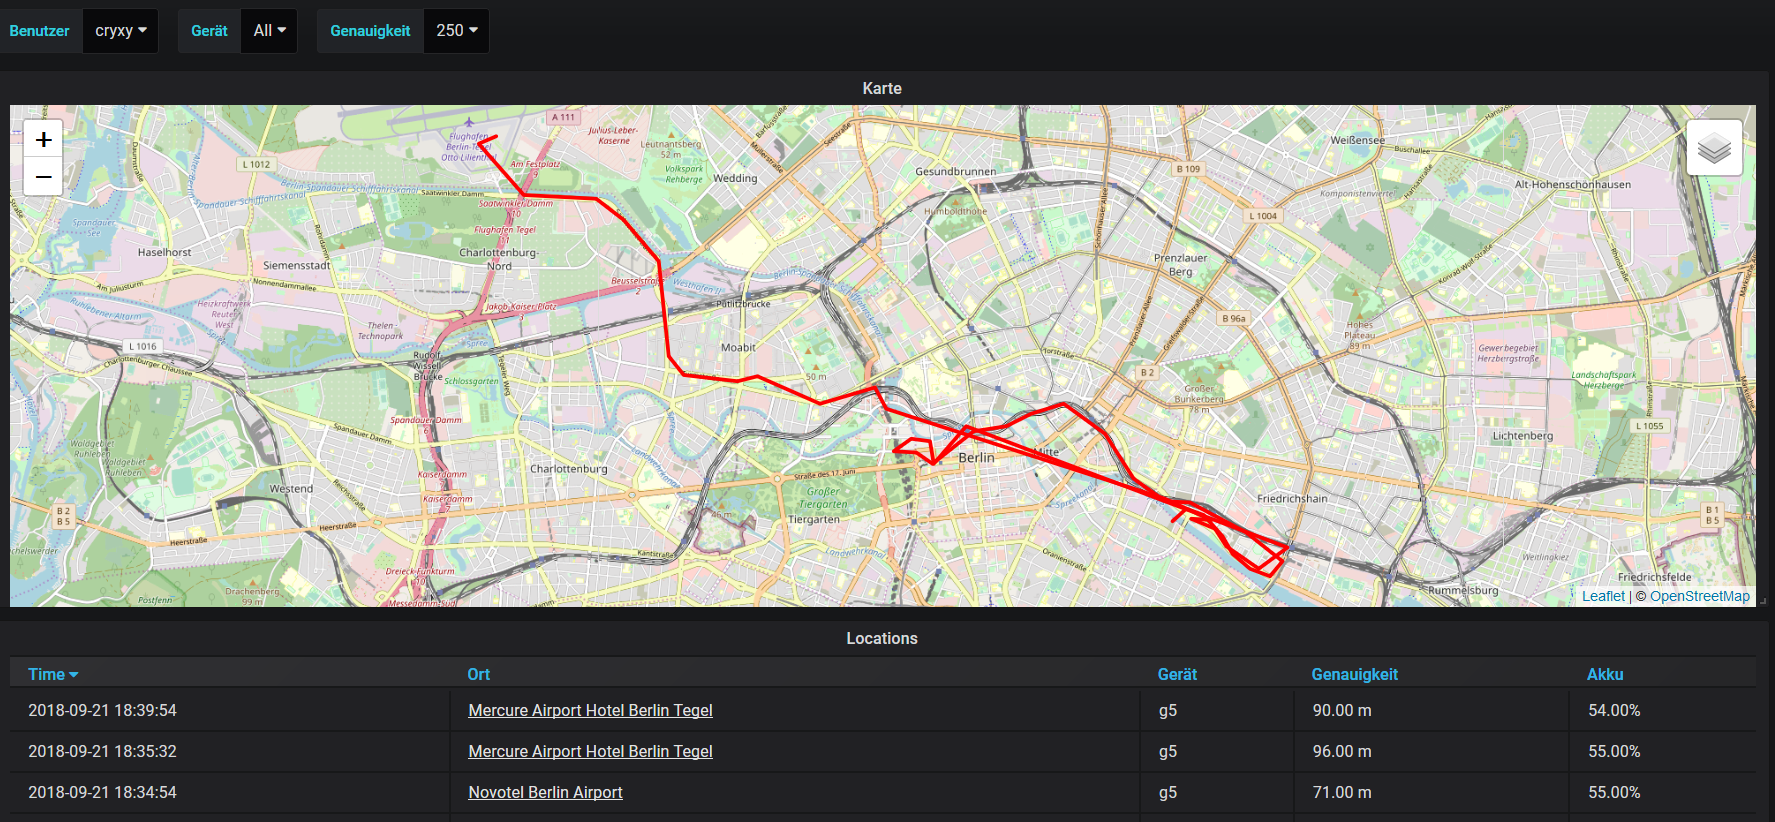
Query: SELECT "lat", "lon" FROM "locations" WHERE ("userName" =~ /^$user$/ AND "deviceName" =~ /^$deviceName$/ AND "accuracy" =~ /^$accuracy$/) AND $timeFilter
System requirements
OwnTracks app (Android / iOS)
MQTT broker (Mosquitto, …)
InfluxDB
Docker or JRE (>= 1.8)
Grafana (optional visualization)
Getting started
Create InfluxDB Database and Users
$ influx
Connected to http://localhost:8086 version 0.13
InfluxDB shell version: 0.13
> CREATE DATABASE owntracks_db
> CREATE USER owntracks WITH PASSWORD 'AnotherSuperbPassword456-'> CREATE USER grafana WITH PASSWORD 'PleaseLetMeRead789?'> GRANT ALL ON owntracks_db TO owntracks
> GRANT READ ON owntracks_db TO grafana
>exit
This command line tool is aimed at supporting DCC Boxed by simplifying
the XML signing and validation. DCC Boxed communicates using DUIS (an
XML language defined in appendix AD of previous link), this tool signs DUIS
requests (i.e. adding an XML digital signature) and validating DUIS responses
(i.e. validating the XML digital signature and removing it). In addition, it
performs XSD validation.
DCC Boxed is a test tool. It is made available with a standard set of test Smart
Meter Key Infrastructure (SMKI) organisation certificates known as ZAZ1. So
that it is possible to sign and validate signatures, this tool ships with the
same test certificates and associated private keys. This same set of test
certificates and private keys are available with GFI.
Finally, to reduce the work needed to sign the DUIS command the originator
counter will be automatically set to System.currentTimeMillis before the DUIS
is signed. This is to ensure that a strictly incrementing value is present in
each command and aligns with how DCC Boxed computes this internally for
DUIS commands it issues.
Building
A standard maven build:
mvn package
This should result in a jar file being created in the ./target/ folder.
Testing
To generate test coverage:
mvn clean test
Running
The tool can be run in one of two modes, Sign or Validate. In both cases
the tool will print out logging information to stderr.
Sign DUIS
To sign a DUIS message (XML without digital signature) from a file and print to
stdout the signed message (i.e. the XML with the digital signature) issue the
following:
By default the tool will inspect the DUIS request to determine which private key
corresponds to the message to sign. This should cover the majority of the use
cases of the tool. However, it is also possible to provide the signers
credentials as command line arguments (jar file name might vary):
Here the user.pem and user.key are the associated certificate and private
key for the signer. These should both be of the correct format as defined by
SMKI, especially they need to be formatted as pem and the private key is both
EC prime256v1 and in the PKCS8 format.
Counters
DCC Boxed internally generates counters for any message sent from its GUI
devices using System.currentMillis. Thus, to ensure compatibility this tool
will by default also do the same and overwrite the counter provided in the
request id of the DUIS message. If this behaviour is not desired, then the
--preserveCounter option can be given to the signing tool.
Validate DUIS
To validate a DUIS message (XML with digital signature) from a file and print to
stdout the validated message (i.e. the XML without the digital signature)
issue the following (jar file name might vary):
By default the tool will inspect the DUIS request to determine which certificate
corresponds to the sender of the message. This should cover the majority of the
use cases of the tool. However, it is also possible to provide the signers
credentials as command line arguments:
Here the user.pem is the associated users certificate. This should be of the
correct format as defined by SMKI, especially it need to be formatted as pem.
Contributing
Contributions are welcome!
When submitting a pull request, please ensure:
Each PR is concise and provides only one feature/bug fix.
Unit test are provided to cover feature. The project uses junit5. To test,
run mvn test to generate code coverage metrics.
Bugfixes include reference the GitHub issue.
If appropriate, update documentation.
Before committing, run mvn checkstyle:check and mvn formatter:validate.
If you are planning a new non-trivial feature, please first raise a GitHub issue
to discuss it to before investing your time to avoid disappointment.
Any contributions will be expected to be licensable under GPLv3.
As a convenience, to ensure code is correctly formatted it is possible to run
mvn formatter:format to automatically format files as required.
Other Info
Copyright 2022, Smart DCC Limited, All rights reserved. Project is licensed under GPLv3.
Sync directories with unencrypted and encrypted files using GPG encryption functions.
Quick Intro
encrypt.py allows you to easily keep your files in sync between unencrypted (source) directory and encrypted (destination) directory. One use case might be to encrypt your files (code, documents) when putting them to Dropbox by saving them to local directory and having a scheduled job running encrypt.py to encrypt them to Dropbox directory.
First Setup
direncrypt is a Python 3 project that uses Pipfile for managing dependencies. Clone the repository to a local directory and run pipenv install.
It is assumed that GPG has been configured on the host. If not, this is the place to start: https://gnupg.org/. In short, gpg keys need to be generated, and with gpg2 this command should be enough: gpg2 --full-generate-key. Still, the user should familiarise themselves with GPG.
A required next step is to set GPG parameters for direncrypt by running:
python encrypt.py --configure
This will create the inventory database inventory.sqlite from SQL files in sql directory. Some defaults have been pre-set. To change them, specify key value, as shown in the example below:
encrypt.py OPERATION PARAMETERS -v|--verbose

OPERATION
    -e|--encrypt     Encrypts new files from unencrypted directory to encrypted directory
    -d|--decrypt     Decrypts files encrypted with the specified public ID from encrypted
                     to unencrypted directory
       --configure   Runs interactive mode to list and set GPG parameters

PARAMETERS
    -p|--plaindir
    -s|--securedir
    -r|--restoredir
    -i|--public-id
    -P|--passphrase
    -H|--gpg-homedir
    -k|--gpg-keyring
    -b|--gpg-binary
Check Consistency
check.py provides a listing of files based on the register, and also checks the existence of files on the filesystem. The listing is provided in the format similar to this:
Plaindir: ~/DropboxLocal
Securedir: ~/Dropbox/Enc

STATUS PLAINFILE                           ENCFILE
ok  ue subdir/newfile.txt                  398a8fc1-1c33-4e2b-80a2-ae8645007cba
ok  ue test1.txt                           97f204c5-bdcb-4e61-9f7b-ec4bc9fd6824
NOK u  test2.txt                           75d49d5c-bc4c-46ad-b286-c336cc170aff
ok  ue subdir/another.txt                  6471eef4-8a8a-4fb5-858b-200cdcd7b231
NOK  e test3.txt                           cc1f2d27-c006-4d01-8c5d-b356ce482a30

Total files in the register: 5
Check: 3 ok, 2 not ok
State can be inconsistent if the files have been deleted but the register has not been updated. This utility provides two ways to deal with inconsistencies:
check.py --clean|-c: If unencrypted or encrypted file is missing (or both), the remaining existing file (if any) will be deleted from filesystem, and the entry in the register will be deleted.
check.py --resync|-r: If unencrypted file is missing, it will be decrypted to the original location, based on the register entry.
Please note that if encrypted file is missing and unencrypted does not, this is a regular situation that encrypt.py deals with. It should be encrypted on the next call (possibly initiated via cron).
direncryption Library
direncryption.py provides functions used by encrypt.py. Two main methods are encrypt_all() and decrypt_all().
encrypt_all() gets a list of all files under the unencrypted directory and compares their modified time with saved timestamps in database. New files and files modified after the last run will be encrypted.
decrypt_all() reads the register to get the list of files encrypted using the same GPG public ID as the one running now. Then it decrypts all such files using the passphrase provided.
inventory.sqlite Database
This database contains mapping between unencrypted filenames and encrypted filenames, as well as GPG public ID used to encrypt. If lost, there is no way to know where encrypted file originates from. It is recommended to keep a backup of the database in a safe and secure location.
A python library for embarrassingly easy parallelism
Note: Not widely used, kinda beta, probably over sensationalized.
This software is still most definitely beta, and feedback is highly welcomed.
The number of CPU cores in modern computers is increasing at a substantial rate.
For example, a high end server or workstation may now have up to 64 physical cores,
or up to 128 available threads!
Unfortunately python is intrinsically limited by its single threaded design,
as well as the limitations imposed by the GIL (Global Interpreter Lock).
The aim of this library is to break free of this limitation and make it super
easy to distribute nearly any workload across the full capabilities of your
system. In practice, one, or even two full orders of magnitude speed increase can
often be achieved with minimal code modification.
There are typically three ways to achieve parallelism in modern software development…
Asynchronous / Event loops
This is the approach that node.js takes to achieve it’s impressive speed, and
also has first class support available in python starting with version 3.5.
Ultimately, async code is still single-threaded, however by having multiple
tasks sitting on an “event loop,” when a particular task (such as reading a
file, or fetching a resource from the internet) is blocked while performing IO,
other tasks may continue to run uninterrupted.
Threads
Using threads allows a program to run multiple operations concurrently in the
same process space. As mentioned above though, python is a bit quirky in that
it’s most common implementation (CPython) implements a Global Interpreter Lock
which for most practical purposes results in only a single thread being executed
at any given time. The reason for this is to ensure memory safety,
however it usually prevents work in python code operating concurrently.
That said, many operations, such as most calls to a foreign function interface
(e.g. most numpy functions) will allow the GIL to be released, so threads can
improve performance beyond what asynchronous concurrency can provide (which will
only concurrently run tasks which wait on blocking syscalls).
Multiprocessing
Process based parallelism is the granddaddy of concurrency and is the only way
to achieve real simultaneous utilization of multiple CPU cores in python.
When using multiple processes, the parent process is forked into child processes
which each have their own independent Global Interpreter Lock. Further, each
child process is effectively isolated from each other, so there is no concerns
about ensuring memory safety, however care must still be taken when accessing
other shared resources, such as files or databases.
Typical multiprocessing in python requires a rather large amount of boilerplate
code. To be fair, it is still relatively straightforward:
Running this code will fork 5 child processes. On one test run, the following
was printed:
Worker: 3
Worker: 0
Worker: 2
Worker: 1
Worker: 4
For a single long running task, this built in API is often sufficient, however
it very quickly becomes difficult and unwieldy to orchestrate complex
workflows.
Installing
At present, We do a few fancy tricks that makes mpyx only suitable on UNIX-like systems.
The easiest way to start taking advantage of mpyx is to parallelize a sequence
of functions. Suppose you have a simple image processing pipeline that looks
something like:
# Before mpyx...forimage_fileinimagesInDir("./original_pics"):
image=imread(image_file)
resized=resize(image)
enhanced=enhance(resized)
watermarked=watermark(enhanced)
imsave(join("./site_pics/", image_file))
The trouble is that each image is being processed serially. Each image
is read, then resized, then enhanced, then watermarked, and then saved, in turn.
If you are running a website, or have to process folders with 1000’s of images
each, this could take a large amount of time. So, why not have each part of the
process being run in parallel? Well, that’s what mpyx is here for.
First let’s introduce the most important tools in mpyx: EZ and F.
Here is a look at what the above workflow could be like using EZ:
ImgFiles and SaveTo are subclass instances of F which are explored
more later, but the meat of this example is that each function, imread, resize, enhance, watermark, are all operating in parallel now.
A good analogy is to consider the difference between a single person running
back and forth between a pond and a fire with a bucket, and 20 people forming
a bucket brigade, passing buckets along between the pond and the fire.
EZ
EZ is a wrapper for an internal class called Indurate (a latin word
meaning to strengthen, or harden, or make firm). The details of Indurate are
relatively unimportant, but what it does at a high level is set up a sequence
of multiprocessing.JoinableQueues between each part of your workflow.
There is a caveat however; suppose that most of the above image processing task
is very quick, but resizing the image takes much longer than the other
parts. As they say, a chain is only as strong as its weakest link.
Manual tuning is required.
Pull requests that add automated process number scaling are welcomed.
Assuming this lib gets any traction, the next big TODO is paralleling
optimally.
To resolve this for now, EZ is able to receive arbitrary nested data
structures that can represent virtually any combination of sequential,
parallel, or broadcast/split data pipelines.
[] – lists represent sequential operations
() – tuples represent parallel operations
{} – sets represent broadcasted/split operations
Alternatively, (and required in some special circumstances where nested
structures cannot be hashed), there are class wrappers that provide equivalent
functionality, and can be intermixed with the above syntax.
This will spawn a total of 17 processes and should give a huge speedup
on the resize step, even though each image will still take a full second to roll
through this hypothetical processing pipeline.
Tuning the amount of parallelism at each step is a bit of an art, and
does require a bit of trial and error. Fortunately, by using the watch() tool,
it is easy to see in real time how data is flowing throughout the computational
graph, where additional parallel processes should be added, and where
existing ones are unnecessary.
As a final note, you may embed the returned instance from EZ into other EZ
instances, although a small amount of overhead is added by doing this.
F
Although it is possible to use vanilla functions in a mpyx pipeline, F is the
base class that can be extended from to provide advanced functionality during
the life cycle of a child process. It provides useful hooks and methods to
accomplish most needs:
frommpyximportFclassYourTask(F):
definitialize(self, *args, **kwargs):
# This is executed very early on while still in the parent's process# context. Usually you won't need to override this method, but can be# useful to perform some kinds of early configuration that cannot# be accomplished once this process is forked into a child.passdefsetup(self, *args, **kwargs):
# If your process needs to do any kind of setup once it has been forked,# or if it the first process in a workflow and expected to generate # values for the rest of the pipeline, that code should go here.passdefdo(self, item):
# The main workhorse of a process. Items will flow in here, potentially# be modified, mapped, reduced, or otherwise morgified, and output can # be then pushed downstream using the self.put() method. # Here, for example, any items are simply passed along.self.put(item)
defteardown(self):
# Once there is no more data to process, the teardown() method is # called. This is useful for commiting changes to a database, or # performing necessary cleanup such as closing pipes or sockets.pass
Most complicated tasks will benefit from being declared as a subclass of F,
however as mentioned previously, if your task is a simple mapping of foo(x) -> y, you may use foo as a function in its vanilla state.
An important gotchya is that F derived classes must be instantiated for use
within an EZ processing pipeline. This is to allow parameters to be set
before the child process is forked.
Here is a complete example of a trivial pipeline for clarity:
In aspect-oriented software development, cross-cutting
concerns are aspects of a program that affect other concerns. These concerns
often cannot be cleanly decomposed from the rest of the system in both the
design and implementation, and can result in either scattering (code duplication),
tangling (significant dependencies between systems), or both. – Wikipeda
.meta
Very often there are problems isolating each process to be completely
independent from each other. In the image pipeline example, it would be useful
for the last child process SaveTo to know what the original file name was
from ImgFiles so that it could name the file correctly in the destination
folder.
Instances of F provide a special member property meta which is a dict
that will propagate through the EZ pipeline and are distinctly attached to a
specific item. This is very useful when attaching ancillary information as required.
Here are some potential concrete implementations of ImgFiles and SaveTo
using meta to pass along the image filename:
Note: Any modifications to meta must be done before put is called.
.xcut()
EZ(...).xcut("attr_name", EZ(...))
Sometimes a cross cutting concern requires actions to be performed at various
places within a pipeline that demand a shared context. Common instances of this
is opening and holding a single database transaction for the duration of the
work, or sharing a logging facility between all the child processes.
For this, mpyx offers the xcut method on instances of Indurate
returned from EZ
xcut attaches a special queue on every child process within its computation
graph. This perhaps can be best explained with another code example:
classDBWriter(F):
defsetup(self):
self.conn=OpenDatabaseAndGetTransaction()
defdo(self, query)
self.conn.query(*query)
defteardown(self):
self.conn.commit()
self.conn.close()
classEx_Task1(F):
defdo(self, item):
# self.db is injected using .xcutself.db.put(("UPDATE stats SET seen = seen + 1 WHERE item = ?", item.id))
# send item along to Ex_Task2self.put(item)
classEx_Task2(F):
defdo(self, item):
ifsome_check_if_item_is_valid(item):
# self.db is injected here too.self.db.put(("UPDATE stats SET valid = True WHERE item = ?", item.id))
self.put(item)
# Tip: xcut EZs will automatically start() when a dependant workflow is started. writer=EZ(DBWriter())
wflow=EZ(SomeDataSource(), Ex_Task1(), Ex_Task2())
wflow.xcut("db", writer)
wflow.start()
# or as a 1-linerEZ(SomeDataSource(), Ex_Task1(), Ex_Task2()).xcut('db', EZ(DBWriter())).start()
.catch()
def handler(exception, traceback)
EZ(...).catch(handler)
By default, when an exception occurs in a child process, it will signal to
all running processes in the processing pipeline to stop and cleanly exit.
By appending a .catch() you can define your own error handling infrastructure.
E.g. to recover and or restart processing as required.
To use this you must define your error handling function:
importtracebackdeferr_handler(e, tb):
# e is the exception# tb is the corresponding traceback, as a list.print(
"".join(
traceback.format_exception(
etype=type(e), value=e, tb=e.__traceback__
)
+tb
)
)
print("Restarting...")
do_work()
defdo_work():
EZ(Task1(), Task2(), Task3()).catch(err_handler).join()
do_work()
Manual wiring
In addition to meta and xcut there is also the option to manually create
instances of Queues, Events, and Pipes and supply them as arguments
to your instantiated F objects during the initialize portion of the process
life cycle.
For convenience, the following shortcuts are available on the F class object:
Alias
Maps to
F.Queue
multiprocessing.JoinableQueue
F.Event
multiprocessing.Event
F.Pipe
multiprocessing.Pipe
As and By
EZ(As(4, Task, arg1, arg2, ...))
EZ(By(4, Task, arg1, arg2, ...))
For easy instantiation of many parallel processes two auxiliary functions
are provided by mpyx. As will instantiate several instances of a subclass
of F in parallel mode, and By will do the same, but in Broadcast mode.
frommpyximportEZ, As, FclassSomeTask(F):
defsetup(self, arg1, arg2):
self.arg1, self.arg2=arg1, arg2defdo(self, item):
# do work on itemEZ(SomeDataSrc(), As(8, SomeTask, "arg1", "arg2")).start()
Built in Wrappers
Many common operations have been included within the mpyx module and may
be imported directly by name.
Common Operations
Const(item, limit=None)
"A constant value generator"Iter(iterable)
"A simple iterator that flows an input iterable into the process graph"Filter(fn, *args, **kwargs)
"Filters input -> output by function"Map(fn, *args, **kwargs)
"Maps input -> output by function"Batch(size=64)
"Groups input into batches of 'size'"Zip(*fns)
"Similar to the builtin zip() this will merge the results of broadcasted sets""into a zipped array"Print(prefix=None)
"A simple pass-through that prints out what it receives"Stamp(pre="Processing item")
"A simple debug counter to to track items in the workflow"Read(filepath, mode='r')
"Read a file line-by-line"Write(filepath, mode='w'):
"Write out to a file. Up to you to add new-lines"
In addition, there are some work-in-progress extensions that you may find useful.
Data
In practice, when working with large data (e.g. 4k video frames), transferring
information between processes using multiprocessing queues can become a
throughput bottleneck. To overcome this, a Data sled can be used. Instead of
transferring the data through the queue, an instance of Data will transparently
write a temporary file to /tmp and simply pass the filename through the queue,
along with properties that were declared on self.
This can improve throughput as much as 2-3x when moving large data sets through a
processing pipeline, especially if /tmp is mounted using tmpfs (ramdisk). One
gotcha however is that the .clean() method must be called when done with a
instance of Data or else you may experience out of memory errors.
Internally, numpy.save and numpy.load are used. Corner cases such as bifurcating
when performing broadcast pipe-lining are handled correctly.
frommpyximportEZ, F, Data"""API (of instances of Data): Data.store("key", value) # Store data to temp file Data.load("key") # Load from temp file Data.clean() # remove temp files."""# Example:classFrame(Data):
def__init__(self, number):
self.number=numberclassGetFrames(F):
defsetup(self, video_file):
num=0forfinsome_load_video_function(video_file):
num+=1frame=Frame(num)
frame.store("frame", f) # writes out temp fileself.put(frame)
classProcFrame(F):
defdo(self, frame):
f=frame.load("frame") # load from temp file# ... do something with the frame dataframe.store("frame", f) # update temp file self.put(f)
forframeinEZ(GetFrames(video_file), ProcFrame()).items():
processed_frame=frame.load("frame") # load updated temp fileprint("processed frame", frame.number)
imshow(processed_frame)
frame.clean()
Video
This module is rather crude, but is effective at wrapping FFmpeg for the purposes
of all combinations of file->file, file->stream, stream->file, and stream->stream
transcoding, which many other wrappers of FFmpeg seem to lack.
This extension does not yet support automatic detection of frame shape, so for stream
applications frame shape must be user-supplied.
frommpyx.VideoimportFFmpeg# FFmpeg(input, input_opts, output, output_opts, global_opts, verbose=False)"""Opens ffmpeg for reading/writing or streaming.If a shape (e.g. (800, 600, 3) )" is provided for input and/or output,then it will stream through pipes, otherwise it will read/write to file."""#ExampleEZ(
FFmpeg("somefile.avi", "", (1920, 1080, 3), "", "", False),
As(4, FancyProcessVidFrame),
FFmpeg((1920, 1080, 3), "", "outfile.avi", "", "", False)
).start()
API Reference
F
Lifecycle
classYourTask(F):
definitialize(self, *args, **kwargs):
# pre-fork()# cannot use self.put()defsetup(self, *args, **kwargs):
# post-fork()# can use self.put()defdo(self, item):
# received inputself.put(item)
defteardown(self):
# all predecessors finished, input queue drained.
Available methods
self.put(data)
Puts an item into the outgoing queue
[fn|self].stop()
End the process ASAP. Commonly used within .setup to demarcate the end of new
data and end the process.
self.async(coroutine())
Helper function to await on an async function.
self.myAsync(coroutine
Helper function to call and await on an async function.
self.sleep(seconds)
Pauses the function for a little while
[fn|self].started()
Returns whether this process has started yet or not.
[fn|self].stopped()
Returns whether this process has started shutdown yet or not.
[fn|self].finished()
Returns whether this process has completed and exited yet or not.
Block until all work has completed. Will call .start() if not already started.
e.stop()
Ends all processes in the computation graph,
even if they have not finished working.
e.stopped()
Returns whether all child processes are in the .stopped() state.
e.items()
Returns a lazy generator that emits any output items from the computation.
e.list()
Same as .items(), but waits until the computation is finished and returns
a concrete list of results.
e.watch()
Starts a watchdog process that prints to stdout the current queue sizes. Useful
for determining where bottlenecks are located (and where you should add more parallelism 🙂
e.unwatch()
Stops a previous started watchdog.
e.graph()
Return a nested interpretation of the current computation graph.
e.printLayout()
Pretty Prints the current computational graph. [TODO: Document format]
e.daemonize()
Sets daemon = True on all child processes. Must be called before starting.
Internals
EZ Wiring
Every instance of F has the following important properties which manage how it
behaves relative to its location in the computational graph. These properties
should be considered as private, however they are available for inspection if
required.
.inputs – An array that holds references to Queues that could emit items
into this processes’ do(item) method.
.outputs – An array that holds references to Queues that will be added to if self.put(item) is called.
.infrom – An array that holds references to immediate predecessors in the
computational graph.
EZ will traverse its given data structure and appropriately connect each
process to their predecessors and ancestors while respecting the semantics
of sequential, parallel, or broadcast processing.
Care should be taken, as during construction of the graph by EZ each
nested collection will instantiate its own Indurate. To correctly pipe
inputs and outputs into the worker processes, shared instances of the .inputs and .outputs arrays may be created. Specifically, the Indurate
instances and the F instances may sometimes share a reference to the same array. As a consequence, reassigning a worker processes’ .inputs or .outputs will probably cause unwanted and undefined behavior.
F Lifecycle
For reference, the complete life cycle of a F instance is as follows:
Methods that are executed in the parents process with #P and methods executed
within the child with #C
Methods intended to be overridden are marked with a *
Methods intended to be called by parent as part of control flow are marked with !
Follow this doc to set up flutter-ICP Integration : Doc Link
Steps to follow
Clone one copy of this repository in WSL ubuntu location and other in your Windows or MacOs location
For the repository cloned in WSL run the following commands :
dfx start --background
dfx deploy
For the repository cloned in your windows follow these commands:
flutter pub get
Run the flutter app after setting up STEP 5
then run,
flutter run
Set up ngrok in your device, open ngrok terminal and then run the following commands
ngrok http 4943
Copy the forwarding link and then paste as mentioned below
Set up adb in your device, then run the following commands
 - adb devices

 - adb reverse tcp:8000 tcp:8000

 as my app backend is running on 8000, change according to your port number of your app backend
Paste connection links:
 a. In your flutter main.dart : paste the ngrok forwading link in the authentication function

 const baseUrl = 'https://7b5a-171-76-59-100.ngrok-free.app/';
About the app 👇
auth_counter
An authorized counter example
What we do in this example
We have a increment method in backend motoko code, which requires an non-anonymous identity to call.
We try to connect with internet identity to fetch user’s identity.
If the identity is anonymous, the smart contract will return with error
If the identity is not anoymous, the smart contract will execute the actual increment.
agent_dart does not provide any UI related feature or components to keep itself clean as dart code.
agent_dart_auth uses an third-party plugin called flutter_web_auth to open up a WebView window to display the middle page.
middle page is used to redirect current authenticating request to internet identity, the reasons to do so are as folowing:
internet identity ONLY accept browser request, it uses window and postMessage to complete the authentication flow. Thus third party apps like flutter or mobile apps can not pass parameters to it directly.
Why don’t we call its contract/canister directly? Because user keeps their II anchor number in their browsers, there’s no way to extract those identities out of the browsers.
The MOST IMPORTANT reason is that, when user authorize DApps on Mainnet, the II will calculate the delegation identity using DApps’ url. If the url changes or use localhost, the delegation result will change. Thus we have to use a middle page to trick II we had our requests are from our DApps’ webpage, which means you have to deploy at least one webpage to mainnet and to the same and stable auth url to II.
The middle page is a very simple example that how do we complete the flow. There are still limitations:
the project is coded by lit-html, if you are using React or Vue, you have to transpile yourself.
THere are difference between android and ios in auto-redirecting. User have to click when web-to-flutter flow on Android, but flutter-to-web flow on iOS.
Can we make it easier?
If you are tyring to use II, currently, no. Limitation is too much there.
AstroX is implementing our own identity service, which will link II as one of the identity providers. After we finish that part, we will make a flutter plugin to call smart-contract method directly, maybe without Webview popup.
Special Thanks
Nikola from Distrikt.io, helped us to come up with the solution. sidc0des and RMCS from Canistore, helped us to debug latest agent-js dependencies and they complete the service worker for web. Solution and code will come after.
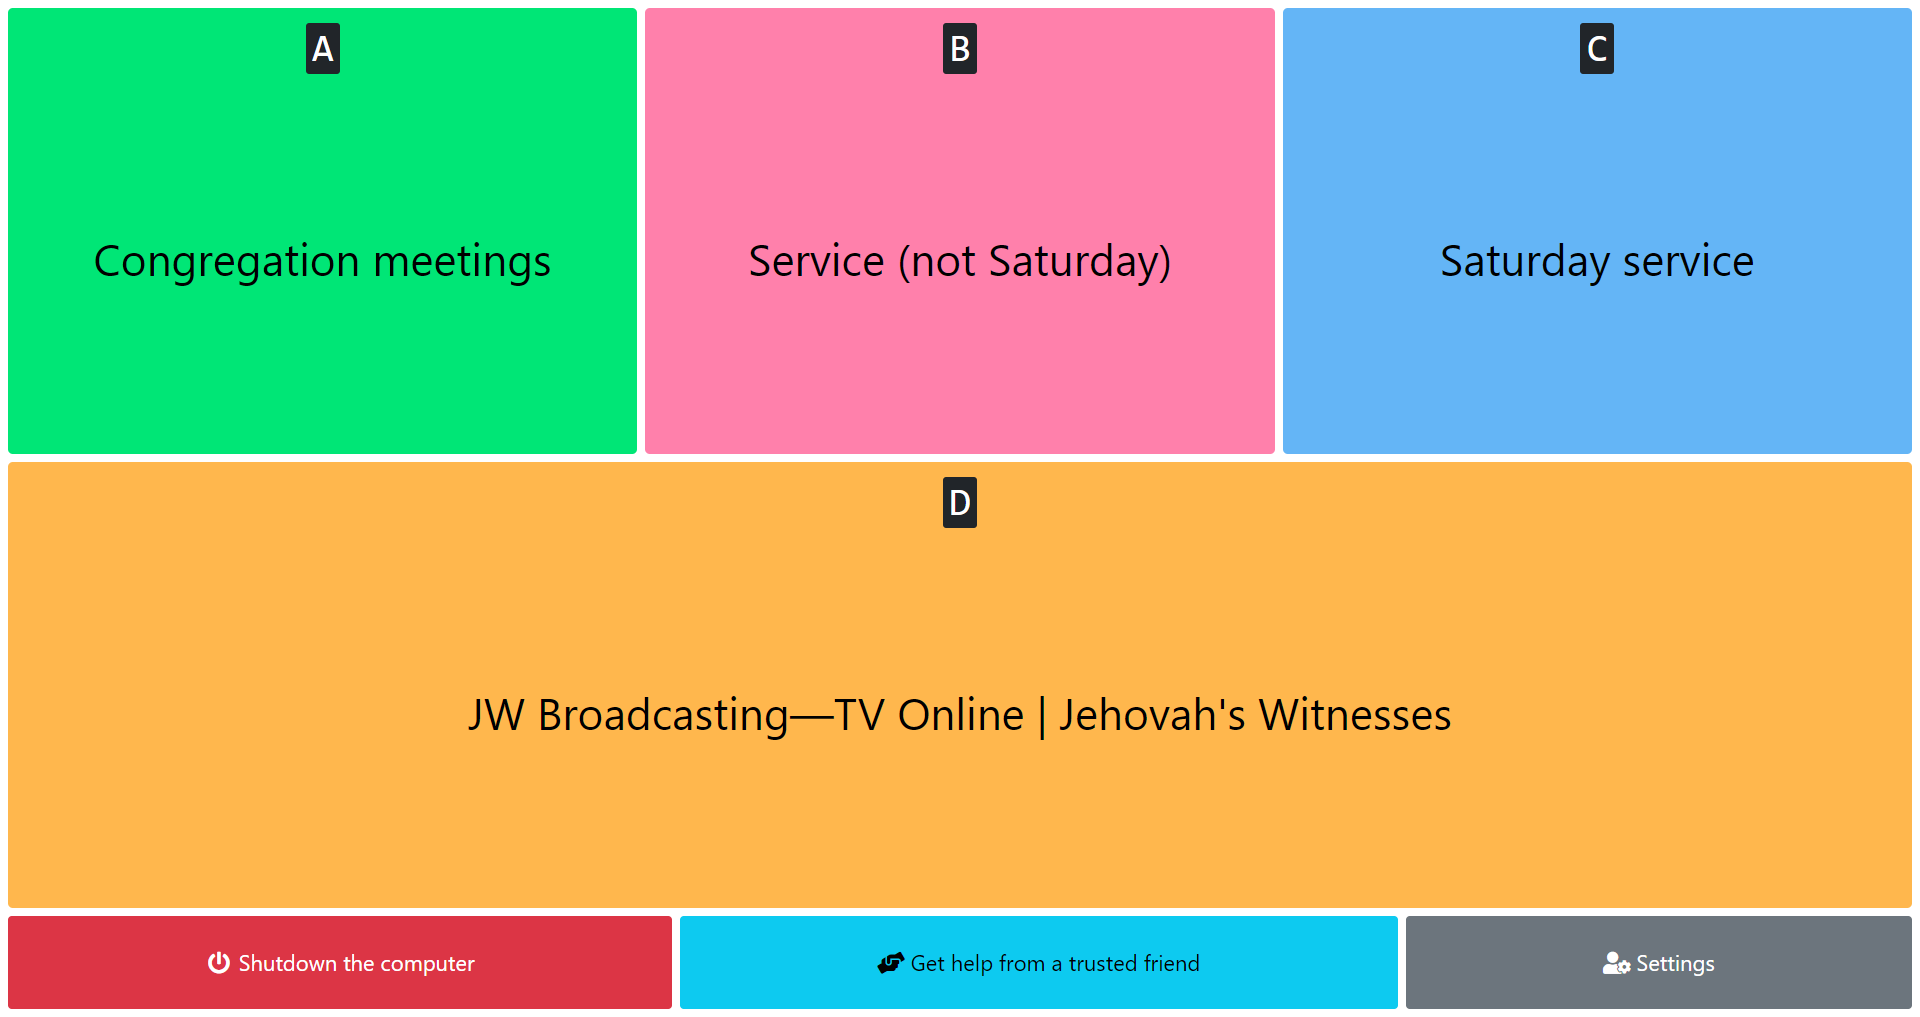
Here is a simple app that facilitates launching Zoom meetings and special programs from JW Stream, as well as playing videos from JW Broadcasting, made specifically for our dear elderly ones who might have trouble connecting to meetings, service, assemblies, conventions and the like, on their own.
There are also optional buttons to launch a TeamViewer session, should remote help be needed, and a button to shut down the computer.
The app can be set to run automatically when the computer boots, and even to launch certain Zoom meetings or JW Stream events at specified times. This could be especially useful for an older person if combined with a password-less computer login. After turning on the computer, the user would then be automatically connected to the appropriate meeting, at the right time.
Installation and usage
Simply download the latest installer from here and run it.
Trouble installing? Check the Technical usage notes section for help.
Once the setup is complete, a shortcut to the app will be placed on your desktop. Open the app, and configure the settings as you please.
Configuration
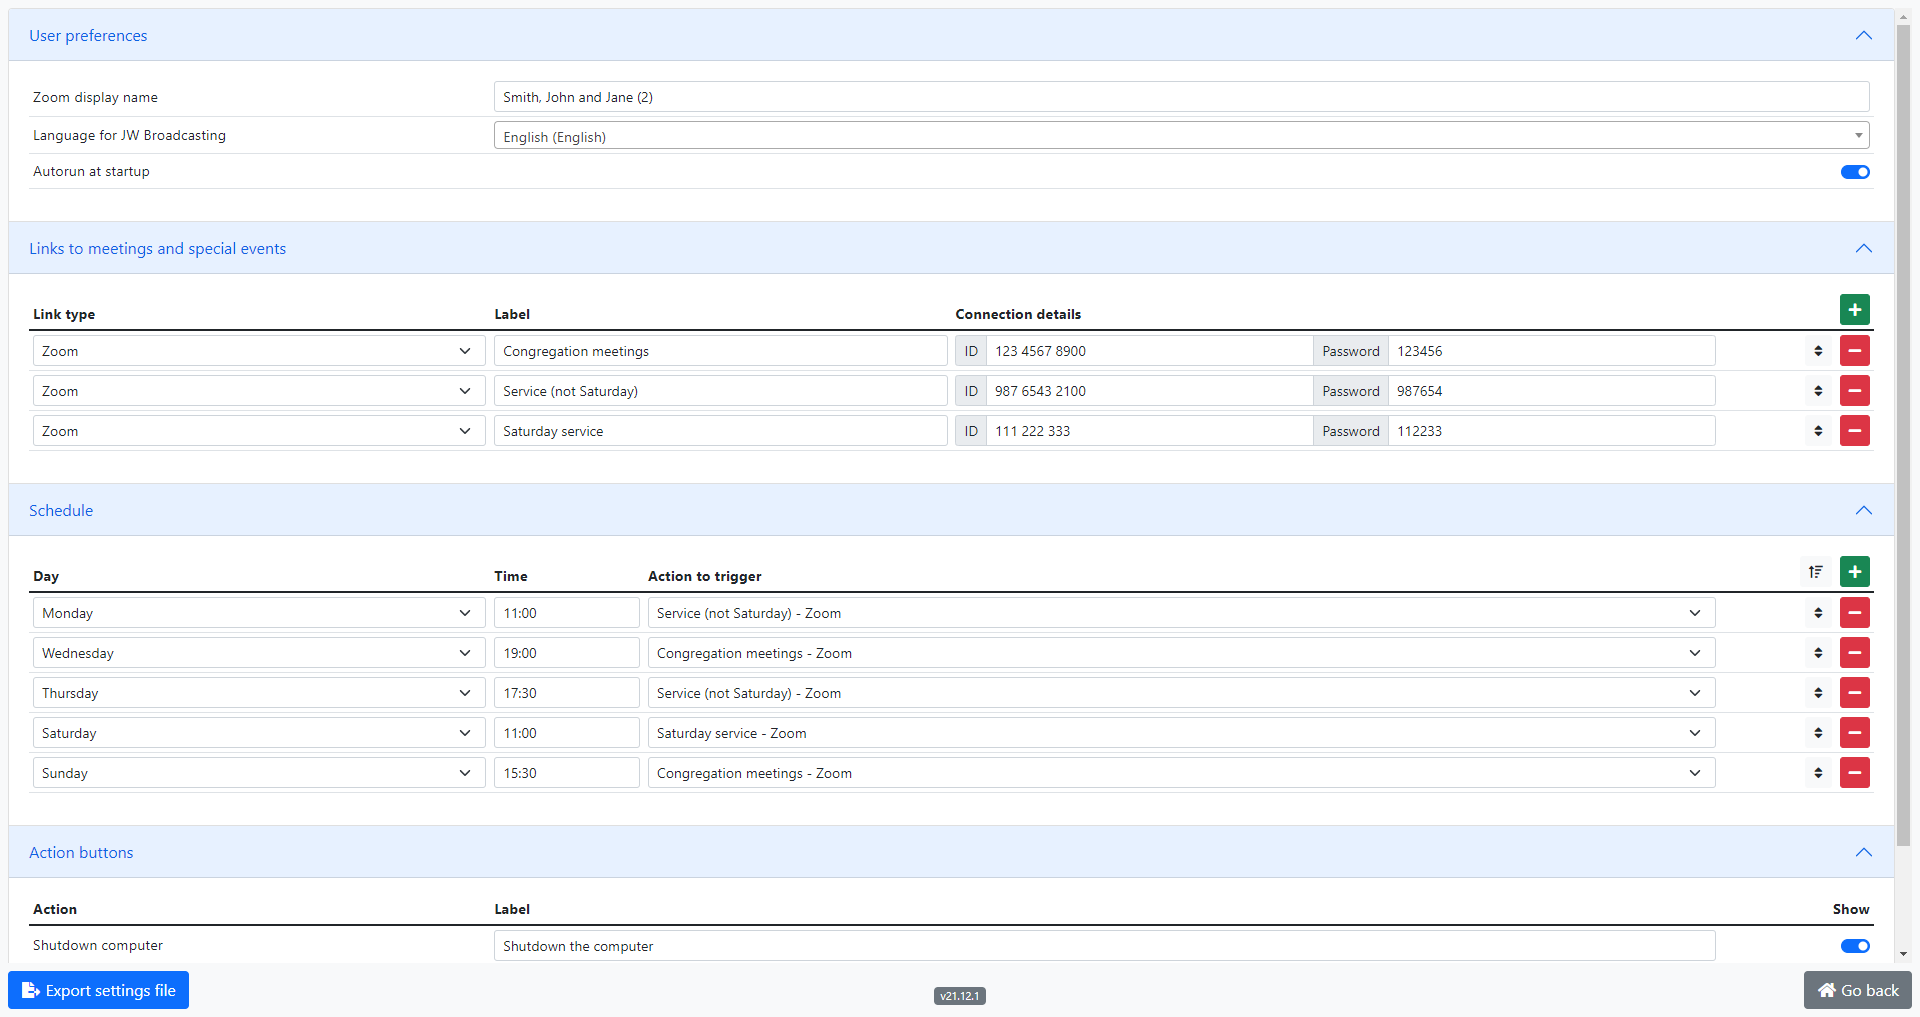
User preferences
Here, you can set the name to display on Zoom, the language for JW Broadcasting, and if the app should automatically launch on start-up.
Links to meetings and special events
Click on the “+” button to add a link to a Zoom meeting or JW Stream URL. Items can be rearranged by dragging and dropping. To delete a line, click on the red “-” button.
Schedule
Click on the “+” button to add a recurring weekly event, such as a service group or a congregation meeting. Set the usual weekday and time of the event, and the associated action to launch at that time.
Events in this list will be auto-launched at the defined time, if JW Launcher is opened or already running at that time.
Note: The predetermined window during which a scheduled event will be auto-launched is defined as the time period extending from 30 minutes before the event’s start time, to 105 minutes (1h45m) after the start time. This will ensure that the user is automatically reconnected if the computer or JW Launcher is restarted during an event.
As many items as needed can be created. Actions can be scheduled more than once per week, and can be rearranged by dragging and dropping. The Sort All button will sort events by weekday and time. To delete an event, click on the red “-” button.
Action buttons
Here, you can hide or show the buttons that allow the user to shutdown their computer, or launch a TeamViewer session. You can also set the names of the action buttons, to make them easier to recognize for the user.
Technical usage notes
Zoom should be installed and configured on the computer before attempting to use this app. The app itself should run as is on most modern computers running Windows, Linux, or Mac.
Windows
On opening the installer, you might get an error indicating that “Windows SmartScreen prevented an unrecognized app from starting”. This is due to the app not having a high number of downloads, and consequently not being explicitly “trusted” by Windows. To get around this, simply click on “More info”, then “Run anyway”.
For technical reasons, the auto-updater does not work on macOS. Mac users will instead see a red, pulsing notification on the main screen of the app and in Settings when an update is available. Clicking on the notification in Settings will open the latest release’s download page automatically.
If upon launching the app, you receive a warning that the app cannot be opened, either because “it was not downloaded from the App store” or “the developer cannot be verified”, then this Apple support page will help you to get past that.
If you get a message indicating that you “do not have permission to open the application”, then try some solutions from this page. For example, you could try running this command in Terminal:
codesign --force --deep --sign - "/path/to/JW Meeting Media Fetcher.app"
Help, there’s a problem
If ever you run into any issues with the app or the underlying script, please use GitHub Issues to let me know.


 https://github.com/KarmaKamikaze/FCDS


