Blog

  • discourse-seed

    Module for seeding the Debt Syndicate’s Discourse instances with Collectives, User Groups, Wikis, Settings, and anything else we need to bend Discourse to our purposes.

    Guidance for contributors

    If you need to make a new endpoint accessible in the discourse-node-api you may mask the request by using the auth<METHOD> functions exposed by the DiscourseApi instance until your PR in the discourse-node-api is merged and available for use.

    Any unhandled error will kill the script, so handle them early if you expect them.

    Discourse API docs are here. The docs are kinda bad though, so the best thing to do is use Wireshark and sniff an API call after making it manually through the front-end and mimicking that through the Discourse API. Most endpoints work using the same exact route that the front-end uses. If it doesn’t, try putting .json on the end of the route. More information about reverse-engineering the API here. The main pain-point of the documentation is that almost none of the interesting properties that are editable in a PUT or POST are documented, so the best thing to do really is to figure it out through reverse engineering and not waste your time with the documentation unless you’re going to contribute to them (maybe once we have time we’ll do that and make the Discourse API docs real nice to use).

    Open a PR, get it reviewed and approved by a maintainer and once it is merged the CI will seed staging once a maintainer removes the CI hold. 🎊

    Secret Variables

    This script requires a couple secrets to work.
    Really only two of these is a secret but 🤷‍♀️.
    These all have defaults in the script but you’ll need to update the API key and the SSO secret.
    See step 2, below.

    Steps for enabling in new Discourse environments

    1. Generate an API key for the system user (Admin Dashboard -> Users -> system -> generate API key)
    2. Copy secrets.sample to secrets.<env>.js and fill in the correct values.
    3. Upload the secrets file to tdc-secure S3 bucket ensuring public access is OFF. Only the CI policy will have access to this file.
    4. Create a job in the CI workflow for the environment, mirroring how the other environments have it. Note that seed.sh takes a single variable of the environment which should match the <env> part of the secrets.<env>.js from before
    5. Restrict that job to a specific branch.
    6. Push that branch and release the hold in Circle CI for that build.
    7. Success!
    Visit original content creator repository
    https://github.com/debtcollective/discourse-seed

  • ec2-spot-notification

    EC2 Spot Instance Termination Notifier

    AWS EC2 Spot Instance Termination Notices for NodeJs

    NPM version Downloads

    Installation

    Install with npm:

    npm install --save ec2-spot-notification

    Example

    import {SpotNotifier as spot} from "ec2-spot-notification";
    
    spot.once("termination", date => {
        console.log("termination", date);
    });
    spot.once("termination-cancelled", date => {
        console.log("termination-cancelled", date);
    });
    spot.on("termination-not-detected", error => {
        console.log("termination-not-detected", error);
    });
    spot.on("instance-termination", error => {
        console.log("instance-termination", error);
    });
    
    spot.instanceId()
        .then(id => {
            console.log("instanceId", id);
            spot.start();
        })
        .catch(err => {
            console.error("instanceId", err);
        });

    Production usage

    var SpotNotifier = require("ec2-spot-notification").SpotNotifier;
    var aws = require("aws-sdk");
    
    var instanceId = null;
    var elb = new aws.ELB();
    
    SpotNotifier.on("termination", function (date) {
        console.log("Aws termination detected", date.toString());
    
        elb.deregisterInstancesFromLoadBalancer({
            Instances: [{InstanceId: instanceId}],
            LoadBalancerName: "Nutcracker"
        }, function (err, data) {
            if (err)
                console.error("deregisterInstancesFromLoadBalancer", err);
            else {
                console.log("deregisterInstancesFromLoadBalancer", data);
                SpotNotifier.stop();
            }
        });
    
    });
    SpotNotifier.on("termination-cancelled", function (date) {
        console.log("Aws termination cancelled for %s, restarting notifier", date.toString());
    
        SpotNotifier.start();
        elb.registerInstancesWithLoadBalancer({
            Instances: [{InstanceId: instanceId}],
            LoadBalancerName: "Nutcracker"
        }, function (err, data) {
            if (err)
                console.error("deregisterInstancesFromLoadBalancer", err);
            else {
                console.log("deregisterInstancesFromLoadBalancer", data);
            }
        });
    
    });
    SpotNotifier.instanceId()
        .then(function (iId) {
            console.log("Aws Spot Notification instanceId", iId);
            instanceId = iId;
            SpotNotifier.start();
        })
        .catch(function (err) {
            console.error("Aws Spot Notification instanceId", err);
        });

    Test

    ubuntu@ip-172-31-2-186:~/ec2-spot-notification$ npm run test-server
    instanceId i-05858013e
    termination-not-detected 404
    termination-not-detected 404
    termination-not-detected 404
    termination-not-detected 404
    termination moment("2017-02-08T12:49:14.000")
    
    Broadcast message from root@ip-172-31-2-186
    	(unknown) at 12:49 ...
    

    Contributors

    We welcome contributions of all kinds from anyone.

    My boss wants a license. So where is it?

    MIT License

    Visit original content creator repository https://github.com/brendtumi/ec2-spot-notification
  • turtlebot-gazebo

    🕹️ Turtlebot Gazebo

    Projeto desenvolvido na disciplina de Robótica Móvel disciplina da UTFPR-PB

    Este trabalho foi desenvolvido com o objetivo de implementar o controle e detecção de colisão de um robô diferencial. Utilizando tecnologias como ROS e Turtlebot-gazebo3.

    ROS, o que é?

    O Robot Operating System (ROS) é uma estrutura flexível para escrever software robô. É uma coleção de ferramentas, bibliotecas e convenções que visam simplificar a tarefa de criar um comportamento robô complexo e robusto em uma ampla variedade de plataformas robóticas.
    Porque? Porque criar um software robô verdadeiramente robusto e de uso geral é difícil. Do ponto de vista do robô, problemas que parecem triviais para os humanos muitas vezes variam descontroladamente entre instâncias de tarefas e ambientes. Lidar com essas variações é tão difícil que nenhum indivíduo, laboratório ou instituição pode esperar fazê-lo por conta própria.

    fonte: ROS

    E o que seria o TurtleBot3?

    TurtleBot3 é um pequeno robô móvel, acessível, programável e baseado em ROS para uso em educação, pesquisa, hobby e prototipagem de produtos. O objetivo do TurtleBot3 é reduzir drasticamente o tamanho da plataforma e baixar o preço sem ter que sacrificar sua funcionalidade e qualidade, ao mesmo tempo em que oferece expansão. O TurtleBot3 pode ser personalizado de várias maneiras, dependendo de como você reconstrói as peças mecânicas e usa peças opcionais, como o computador e o sensor. Além disso, o TurtleBot3 é desenvolvido com SBC econômico e de pequeno porte que é adequado para sistema embarcado robusto, sensor de distância de 360 graus e tecnologia de impressão 3D.

    fonte: Turtlebot3


    ✔️ Pré-requisitos do sistema

    • Instalação do ROS:

    Caso seja necessária siga as instruções do Tutorial ROS

    • Instalação do Turtlebot3:

    Caso seja necessária siga as instruções do Tutorial Turtlebot-Gazebo3


    📝 Instruções de execução do Projeto:

    1. Realize o clone deste projeto na pasta do onde foi instalado o turtlebot-gazebo3:
    cd ~/[nome do workspace]/src/ && git clone https://github.com/keikomori/turtlebot-gazebo
    
    1. Em seguida, para rodar o simulador Gazebo e a aplicação para controlar o robô, execute o comando:
    roslaunch desafio3 controletb3.launch
    
    1. E pronto! Para fazer com que o robô se movimente, insira as coordenadas quando solicitado.

    🔮 Tecnologias utilizadas

    ROS + Python + Linux + Turtlebot-gazebo3


    :bowtie: Desenvolvido por:

    Anderson Rodrigues Pereira

    Guilherme Santos da Silva

    Tatiany Keiko Mori

    Visit original content creator repository https://github.com/keikomori/turtlebot-gazebo
  • Simple-Disassembly-Notes

    ⚙️ Simple Disassembly Notes 🔧

    ⚙️ Simple Step to Step Tutorials for Disassembling / Code Injection & getting Pointer Addresses 🔧

    🔧 Get Pointer Address from Value 🔧

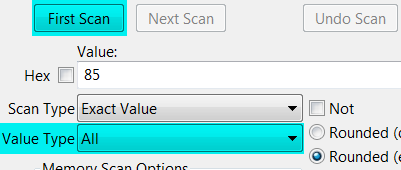
    1. Set Value Type All
    2. Set Value (ex. (Int 32 = 4 Byte = 32 Bit) 85 or (float/double) 85.5) you search for and press First Scan

    Get_Pointer Address_From_Value

    1. Change Value in the Process
    2. The Changed Value will be red, on the left is the Pointer Address

    Get_Pointer Address_From_Value

    🔧 Replace the Assembly Code with Code that does Nothing 🔧

    1. Right Click on Address Record
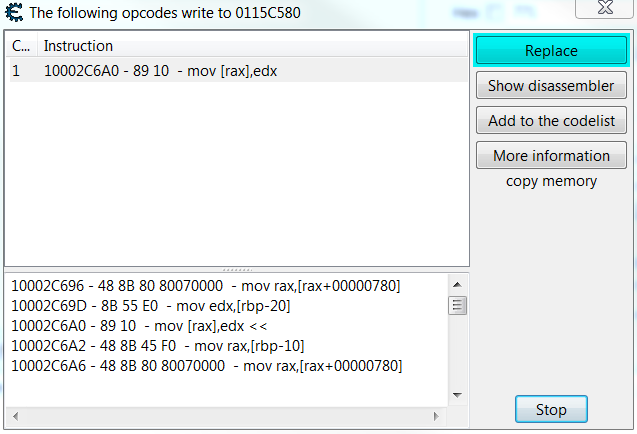
    2. Select Find out what writes to this address
    3. Press on Replace

    Replace the Assembly Code with Code that does Nothing

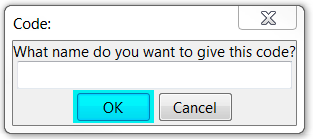
    1. Delete the Assembly Code and Press OK

    Get the Pointer Address from the Pointer of the Value

    🔍 Get the Pointer Address from the Pointer of the Value (Way 1 : easier) (level-1 pointer) 🔍

    1. Read the Address

    Get the Pointer Address from the Pointer of the Value easier

    1. Check Checkbox Hex and put the Address in it
    2. The Address to the Pointer is in this ex. 1002CBA40

    Get the Pointer Address from the Pointer of the Value easier

    🔍 Get the Pointer Address from the Pointer of the Value (Way 2 : harder) (level-1 pointer) 🔍

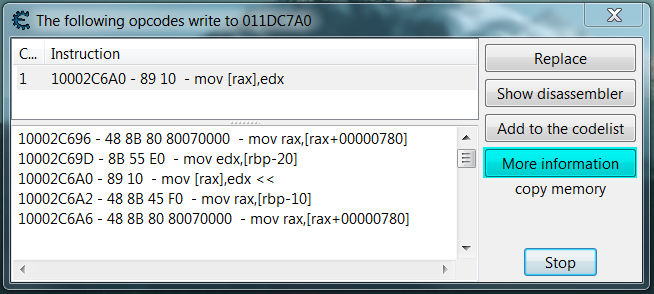
    1. Select Find out what writes to this address
    2. Press on More information

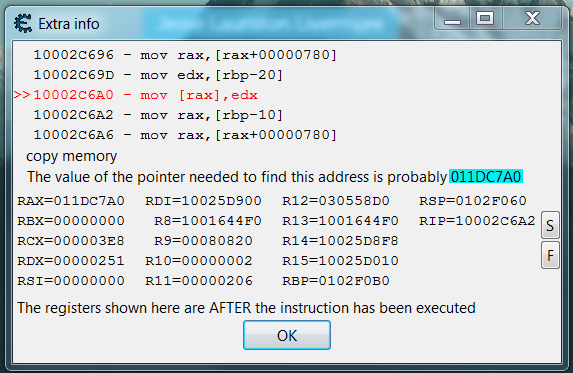
    Get the Pointer Address from the Pointer of the Value

    1. The Address to the Pointer is in this ex. 011DC7A0

    Get the Pointer Address from the Pointer of the Value

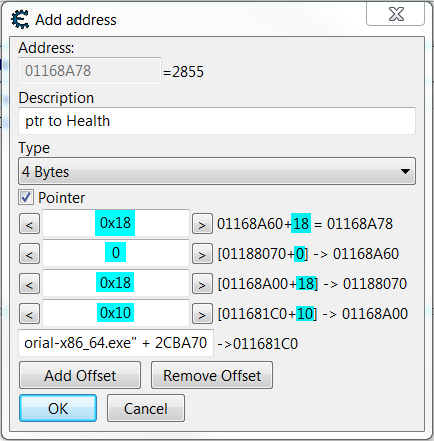
    🔍 Get the base Address from a multilevel pointer (level-4 pointer) 🔍

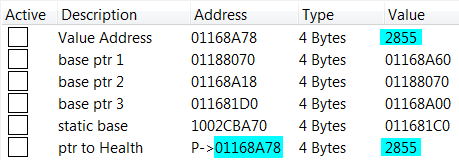
    ➡️ Example of a level-4 pointer ➡️

    Get the base Address from a multilevel pointer level-4 Example

    01168A78 = Address / base pointer (base ptr)

    0x18 = Offset

    “Tutorial-x86_64.exe” + 2CBA70 = static base address

    -> = points to

    01168A78 = Value = 2765

    01188070 -> 1168A60 + 0x18 = 01168A78

    01168A18 -> 01188070 + 0 = 01188070

    011681D0 -> 1168A00 + 0x18 = 01168A18

    “Tutorial-x86_64.exe” + 2CBA70 -> 11681C0 + 0x10 = 011681D0

    Get the base Address from a multilevel pointer level-4 Example

    🔍 How to find out each base pointer with its offsets until you get to the static base address 🔍

    1. Right Click on Address Record
    2. Select Find out what accesses this address

    Get the base Address from a multilevel pointer level-4

    1. Calculate the Address using the Offset ex. -> (01188070 -> 1168A60 + 0x18 = 01168A78)
      Calculation (hex) : (01168A78 – 18 = 01168A60 = 1168A60)
    2. Check Checkbox Hex and put the Address in it (ex. 1168A60)
    3. The Address to the Pointer is in this ex. 01188070
    4. Repeat Step 1 to 5 until you get the static base Address, in this ex. “Tutorial-x86_64.exe” + 2CBA70

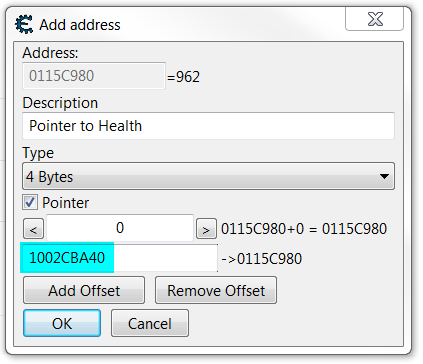
    ⚙️ Add Pointer Address manually (level-1 pointer) ⚙️

    1. Click on Add Address Manually

    Add Pointer Address manually

    1. Add Address, if needed with Offsets and click OK

    Add Pointer Address manually

    1. The Result should look like this:

    Add Pointer Address manually

    ⚙️ Add Pointer Address manually (level-4 pointer) ⚙️

    1. Click on Add Address Manually

    Add Pointer Address manually

    1. Add Address, if needed with Offsets and click OK

    Add Pointer Address manually

    1. The Result should look like this:

    Add Pointer Address manually

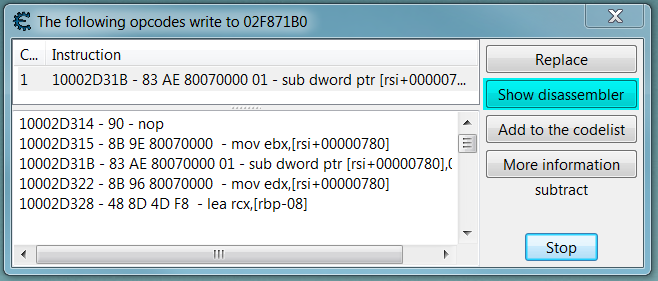
    🛠 Code Injection 🛠

    1. Right Click on Address Record
    2. Select Find out what writes to this address
    3. Press Show disassembler

    Code Injection

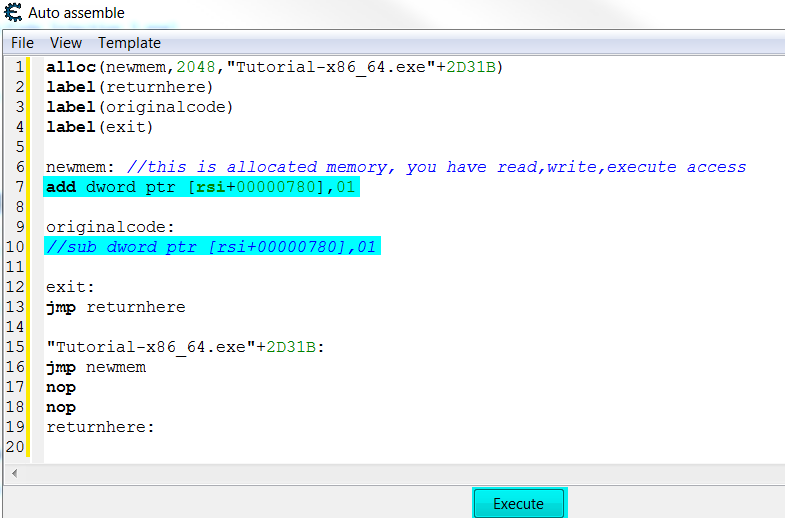
    1. Click on Tools and select Auto Assemble

    Code Injection

    1. Click on Template and select Code Injection

    Code Injection

    1. Click on OK
    2. Comment out as an ex. //sub dword ptr [rsi+00000780],01 (value – 1)
    3. Write as an ex. add dword ptr [rsi+00000780],01 (value + 1)

    Code Injection

    1. Press on Execute and then click OK and it’s Done!

    Binance Ready to give crypto a try ? buy bitcoin and other cryptocurrencies on binance

    Visit original content creator repository https://github.com/IDouble/Simple-Disassembly-Notes
  • LankyLocalSharpeningService

    Visit original content creator repository
    https://github.com/LankySharp/LankyLocalSharpeningService

  • array-base-symmetric-filled2d-by

    About stdlib…

    We believe in a future in which the web is a preferred environment for numerical computation. To help realize this future, we’ve built stdlib. stdlib is a standard library, with an emphasis on numerical and scientific computation, written in JavaScript (and C) for execution in browsers and in Node.js.

    The library is fully decomposable, being architected in such a way that you can swap out and mix and match APIs and functionality to cater to your exact preferences and use cases.

    When you use stdlib, you can be absolutely certain that you are using the most thorough, rigorous, well-written, studied, documented, tested, measured, and high-quality code out there.

    To join us in bringing numerical computing to the web, get started by checking us out on GitHub, and please consider financially supporting stdlib. We greatly appreciate your continued support!

    filled2dBy

    NPM version Build Status Coverage Status

    Create a filled two-dimensional symmetric nested array according to a provided callback function.

    Installation

    npm install @stdlib/array-base-symmetric-filled2d-by

    Alternatively,

    • To load the package in a website via a script tag without installation and bundlers, use the ES Module available on the esm branch (see README).
    • If you are using Deno, visit the deno branch (see README for usage intructions).
    • For use in Observable, or in browser/node environments, use the Universal Module Definition (UMD) build available on the umd branch (see README).

    The branches.md file summarizes the available branches and displays a diagram illustrating their relationships.

    To view installation and usage instructions specific to each branch build, be sure to explicitly navigate to the respective README files on each branch, as linked to above.

    Usage

    var filled2dBy = require( '@stdlib/array-base-symmetric-filled2d-by' );

    filled2dBy( N, clbk[, thisArg] )

    Returns a filled two-dimensional symmetric nested array according to a provided callback function.

    function clbk( idx ) {
        return idx[ 0 ] + idx[ 1 ];
    }
    
    var out = filled2dBy( 2, clbk );
    // returns [ [ 0, 1 ], [ 1, 2 ] ]

    The function accepts the following arguments:

    • N: number of rows and columns.
    • clbk: callback function.
    • thisArg: callback function execution context (optional).

    When invoked, a callback function is provided a single argument:

    • indices: current array element indices.

    To set the callback execution context, provide a thisArg.

    function clbk() {
        this.count += 1;
        return 1;
    }
    
    var ctx = {
        'count': 0
    };
    
    var out = filled2dBy( 2, clbk, ctx );
    // returns [ [ 1, 1 ], [ 1, 1 ] ];
    
    var cnt = ctx.count;
    // returns 3

    Notes

    • As the output array is symmetric, the callback function is only invoked for the elements residing in the upper triangle of the output array (i.e., indices[1] >= indices[0]).

    Examples

    var constantFunction = require( '@stdlib/utils-constant-function' );
    var filled2dBy = require( '@stdlib/array-base-symmetric-filled2d-by' );
    
    var out = filled2dBy( 2, constantFunction( 0.0 ) );
    // returns [ [ 0.0, 0.0 ], [ 0.0, 0.0 ] ]
    
    out = filled2dBy( 2, constantFunction( 'beep' ) );
    // returns [ [ 'beep', 'beep' ], [ 'beep', 'beep' ] ]
    
    out = filled2dBy( 2, constantFunction( null ) );
    // returns [ [ null, null ], [ null, null ] ]
    
    out = filled2dBy( 2, constantFunction( true ) );
    // returns [ [ true, true ], [ true, true ] ]
    
    function clbk( indices ) {
        return indices[ 0 ] + indices[ 1 ];
    }
    out = filled2dBy( 3, clbk );
    // returns [ [ 0, 1, 2 ], [ 1, 2, 3 ], [ 2, 3, 4 ] ]

    Notice

    This package is part of stdlib, a standard library for JavaScript and Node.js, with an emphasis on numerical and scientific computing. The library provides a collection of robust, high performance libraries for mathematics, statistics, streams, utilities, and more.

    For more information on the project, filing bug reports and feature requests, and guidance on how to develop stdlib, see the main project repository.

    Community

    Chat


    License

    See LICENSE.

    Copyright

    Copyright © 2016-2025. The Stdlib Authors.

    Visit original content creator repository https://github.com/stdlib-js/array-base-symmetric-filled2d-by
  • curseforge-upload

    CurseForge Uploader

    An action for interacting with the CurseForge file upload API

    Usage/Arguments

    Name Description Default Value Required
    token Token used to authenticate with CurseForge API. Use a repository secret for this. N/A
    project_id Project id (numerical) to upload file to. You can get the numerical ID from the sidebar on a project page. N/A
    game_endpoint The game subdomain of curseforge.com where the upload request will be made. (minecraft, bukkit, kerbal, etc.) N/A
    file_path The path to the file you want to upload. N/A
    game_versions The game version IDs to select on this file. Separate IDs with commas. See README for more info. []
    release_type The type of this release. Allowed values: alpha, beta, release. release
    display_name The display name for this file. Filename
    changelog The changelog text to put on the file.
    changelog_type The type of the changelog. Allowed values: text, html (aka. WYSIWYG), markdown. markdown
    relations List of projects this file is related to and their relation type. Separate with commas. Format: projectslug:relationType (slug is found in project URL) – Valid relationTypes are: embeddedLibrary, incompatible, optionalDependency, requiredDependency, and tool []
    parent_file_id The id of the parent file to put this file under. (File IDs are integers, found in the URL) None

    Example Workflow

    name: "Build Release"
    on: push
    jobs:
      build:
        runs-on: ubuntu-latest
        steps:
          - { uses: actions/checkout@v2, with: { fetch-depth: 0 } }
          - {
              name: "Set up JDK 17",
              uses: actions/setup-java@v2,
              with: { distribution: "adopt", java-version: "17" },
            }
          - {
              name: "Build with Gradle",
              id: build,
              run: "chmod +x gradlew && ./gradlew build publish",
            }
          - name: "Upload to CurseForge"
            uses: itsmeow/curseforge-upload@v3
            with:
              file_path: "build/libs/examplemod-${{ steps.build.outputs.version }}.jar"
              game_endpoint: "minecraft"
              relations: "fabric-api:requiredDependency"
              game_versions: "Minecraft 1.18:1.18.1,Java 17,Fabric"
              project_id: "0"
              token: "${{ secrets.CF_API_TOKEN }}"

    In this example, a file is uploaded with no custom title to project ID 0 in the Minecraft game category, with a dependency on Fabric API and game versions 1.18.1, Java 17, and Fabric loader.

    The version in the filepath is not exported by default, so you can add this block to your buildscript to do so (this requires the Ubuntu runner):

    exec {
        commandLine "echo", "##[set-output name=version;]${project.version}";
    }

    Getting an API token

    Obtain them here: https://www.curseforge.com/account/api-tokens

    Add the token to your repository’s secrets tab to use it, found under Settings.

    Game Version IDs Explained

    You MUST namespace Minecraft version IDs as there are duplicates in the system for Bukkit.

    API Method

    You can use numerical IDs by making a request to and picking your versions from this API:

    https://endpoint.curseforge.com/api/game/versions?token=your_token

    Using this method is more efficient request wise, as otherwise the Action will have to search this API before requesting the upload.

    Inspect Element Method

    Another method is using Inspect Element on the game version check boxes, the value field contains the version ID.

    Convenience Method

    However, this is not always convenient. You can also use names and slugs from that API, for example: “1.12.2” and “Java 8” will be automatically parsed into the proper id.

    You may encounter issues with names/slugs that have multiple entries with different game version types. The minecraft endpoint has “1.12” 5 separate times with different game version types for Bukkit, Minecraft 1.12, etc.
    To fix this, you can prefix a game version with a Type’s ID, slug, or name. For example “Minecraft 1.12:1.12” would get you ONLY the Minecraft 1.12 version and not the 4 others.

    Another example is “java:Java 8”. This filters to anything named “Java 8” with the type matching the slug/name “java”.

    You can get a list of game version type IDs from this API:

    https://endpoint.curseforge.com/api/game/version-types?token=your_token

    Visit original content creator repository
    https://github.com/itsmeow/curseforge-upload

  • innovation-private-limited-task

    E-commerce Website

    An e-commerce website built using React, Redux Toolkit, Tailwind CSS, Toastify, SweetAlert, and a public product API. The main features include product search, filtering by price, a shopping cart, and a checkout page. Additionally, it utilizes a public API for user login functionality.

    About the Project

    The project is an e-commerce website that allows users to browse through a collection of products, search for specific items, filter products based on price, add them to a shopping cart, and proceed to checkout. It also features user authentication using a public API.

    Features

    • Product search
    • Price filtering
    • Shopping cart
    • Checkout page
    • User authentication (using a public API)

    Demo

    (https://innovation-private-limited-task.netlify.app/login)

    Getting Started

    Follow these instructions to get the project up and running on your local machine.

    Prerequisites

    • Node.js and npm installed on your machine

    Installation

    1. Clone the repository:

      git clone https://github.com/svivek19/innovation-private-limited-task.git
    2. Navigate to the project directory:
      cd e-commerce-website

    3. Install dependencies:
      npm install

    Usage
    Once you have installed the dependencies, you can start the development server:
    ~npm start
    This will run the application in development mode. Open http://localhost:3000 to view it in your browser.

    Contributing
    Contributions are welcome! If you’d like to contribute to the project, please follow these steps:

    1.Fork the repository
    2.Create a new branch (git checkout -b feature/your-feature)
    3.Make your changes
    4.Commit your changes (git commit -am ‘Add some feature’)
    5. Push to the branch (git push origin feature/your-feature)
    6. Create a new pull request

    Contact
    For any questions or inquiries, please feel free to contact me at svivek030503@gmail.com

    Visit original content creator repository
    https://github.com/svivek19/innovation-private-limited-task

  • GemsAssetsWebpackBridge

    GemsAssetsWebpackBridge

    This Rails gem helps to build a bridge from assets in your ruby gems to Webpack.

    pexels-photo-208684

    The Problem

    1. I had a classic monolith Rails application with Sprockets.
    2. I’ve split my Rails app into a few Rails gems and moved my assets into gems.
    3. I started migration from Sprockets to Webpack.
    4. Webpack didn’t know how to find my assets in Rails gems.

    The Solution

    This gem helps to collect paths to assets’ folders in gems and adds some aliases for Webpack to help it to find assets in classic Rails gems.

    Installation

    Gemfile

    gem 'gems_assets_webpack_bridge'
    $ bundle
    

    Usage

    Build a bridge between Rails gems and Webpack:

    rake gems_assets_webpack_bridge:build

    What is The Bridge?

    • The Bridge is a JSON file with paths to assets in your gems.
    • The Bridge provides additional aliases for Webpack to help it to find assets’ folders in ruby gems.
    • Every alias has the following naming: @[UNDERSCORED_GEM_NAME]-[ASSET_TYPE].
    • Default asset types are: images, scripts, styles.
    • By default the file has name gems-assets-webpack-bridge.json and looks like that:
    {
      "@crop_tool-scripts": "/Users/@username/.rvm/gems/ruby-2.4.2/gems/crop_tool/app/assets/javascripts",
      "@crop_tool-styles": "/Users/@username/.rvm/gems/ruby-2.4.2/gems/crop_tool/app/assets/stylesheets",
      "@jquery_ui_rails-images": "/Users/@username/.rvm/gems/ruby-2.3.3@open-cook.ru/gems/jquery-ui-rails-5.0.0/app/assets/images",
      "@jquery_ui_rails-scripts": "/Users/@username/.rvm/gems/ruby-2.3.3@open-cook.ru/gems/jquery-ui-rails-5.0.0/app/assets/javascripts",
      "@jquery_ui_rails-styles": "/Users/@username/.rvm/gems/ruby-2.3.3@open-cook.ru/gems/jquery-ui-rails-5.0.0/app/assets/stylesheets",
      "@log_js-scripts": "/Users/@username/.rvm/gems/ruby-2.4.2/gems/log_js/app/assets/javascripts",
      "@notifications-scripts": "/Users/@username/.rvm/gems/ruby-2.4.2/gems/notifications/app/assets/javascripts",
      "@notifications-styles": "/Users/@username/.rvm/gems/ruby-2.4.2/gems/notifications/app/assets/stylesheets",
    }

    How to use The Bridge?

    Now, when you have the bridge file, you can use it in Webpack like this:

    webpack.config.js

    // This helper-function reads the bridge file and
    // adds some additional aliases in `WebPackConfig.resolve.alias`
    function addGemsAssetsWebpackBridge (WebPackConfig) {
      const alias = WebPackConfig.resolve.alias
      const bridgeFile = `${rootPath}/gems-assets-webpack-bridge.json`
    
      var bridgeAlias = JSON.parse(fs.readFileSync(bridgeFile, 'utf8'))
      return Object.assign(alias, bridgeAlias)
    }
    
    let WebpackConfig = {
      entry: {
        ...
      },
    
      output: {
        ...
      },
    
      resolve : {
        alias: {
          '@vendors': `${rootPath}/assets/vendors`
        }
      }
    }
    
    WebPackConfig.resolve.alias = addGemsAssetsWebpackBridge(WebPackConfig)
    module.exports = WebPackConfig

    After you added the aliases you can use them in your Webpack entries like this:

    require('@log_js-scripts/log_js')
    require('@notifications-scripts/notifications')
    require('@the_comments-scripts/the_comments')
    
    require('@notifications-styles/notifications')
    require('@the_comments-styles/the_comments')

    How can I configure this gem?

    You can create a new initializer in your Rails app change options:

    config/initializers/gems_assets_webpack_bridge.rb

    GemsAssetsWebpackBridge.configure do |config|
      # From a root of your Rails app
      config.bridge_path = '/configs/gems-webpack-bridge.json'
    
      #  From a root of every Rails gem
      config.assets_types = {
        # Default values
        images: 'app/assets/images',
        scripts: 'app/assets/javascripts',
        styles: 'app/assets/stylesheets',
    
        # Your custom values
        vendor_select2_images: 'vendors/select2/images',
      }
    end

    Should I add the bridge file in my VCS?

    No. Paths will be different for different users. Just add gems-assets-webpack-bridge.json in your .gitignore and run rake gems_asstes_webpack_bridge:build when you need it.

    Should I change my deployment process?

    You have to run rake gems_asstes_webpack_bridge:build before every Webpack compilation during deployment. Otherwise Webpack will know nothing about aliases and a compilation won’t work.

    License

    The gem is available as open source under the terms of the MIT License.

    Bridge image @ pexels.com

    Visit original content creator repository https://github.com/the-teacher/GemsAssetsWebpackBridge