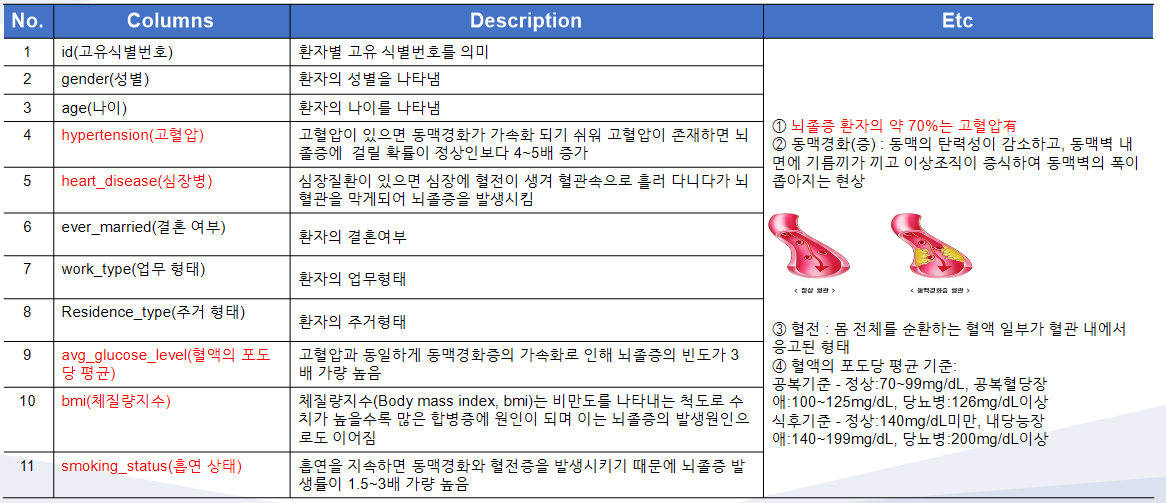
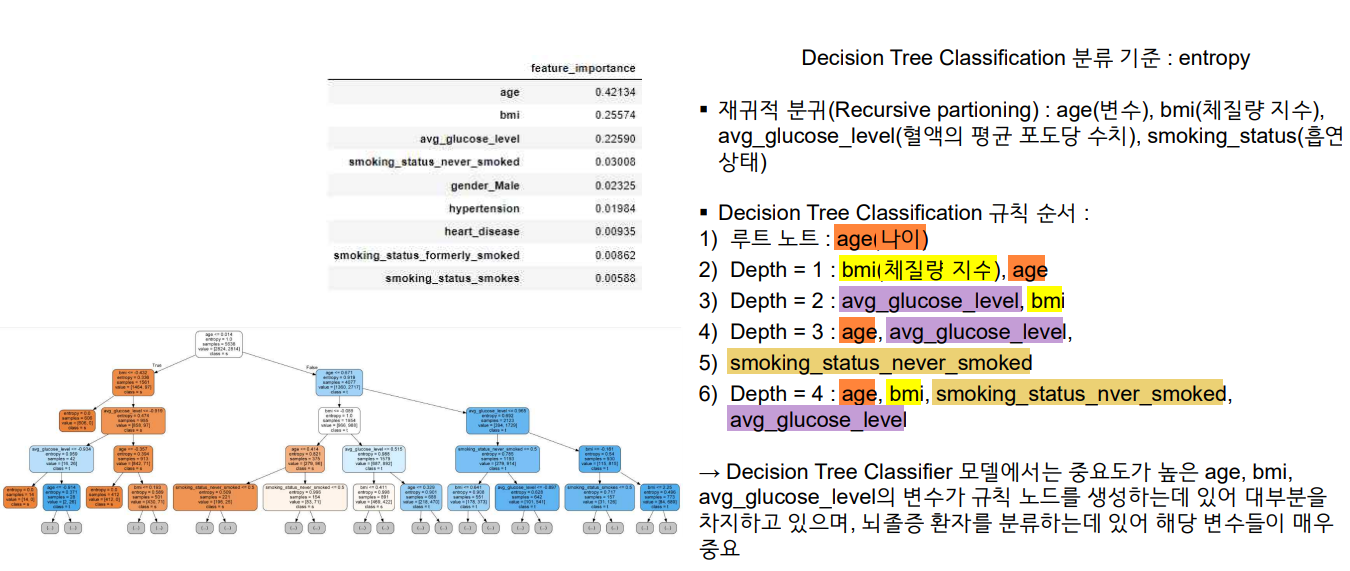
Decision Tree Classifier : age(나이), bmi(체질량 지수), avg_glucose_level(혈액의 평균 포도당 수치), smoking_status(흡연 여부)
Random Forest : age(나이), bmi(체질량 지수), avg_glucose_level(혈액의 평균 포도당 수치), smoking_status(흡연 여부)
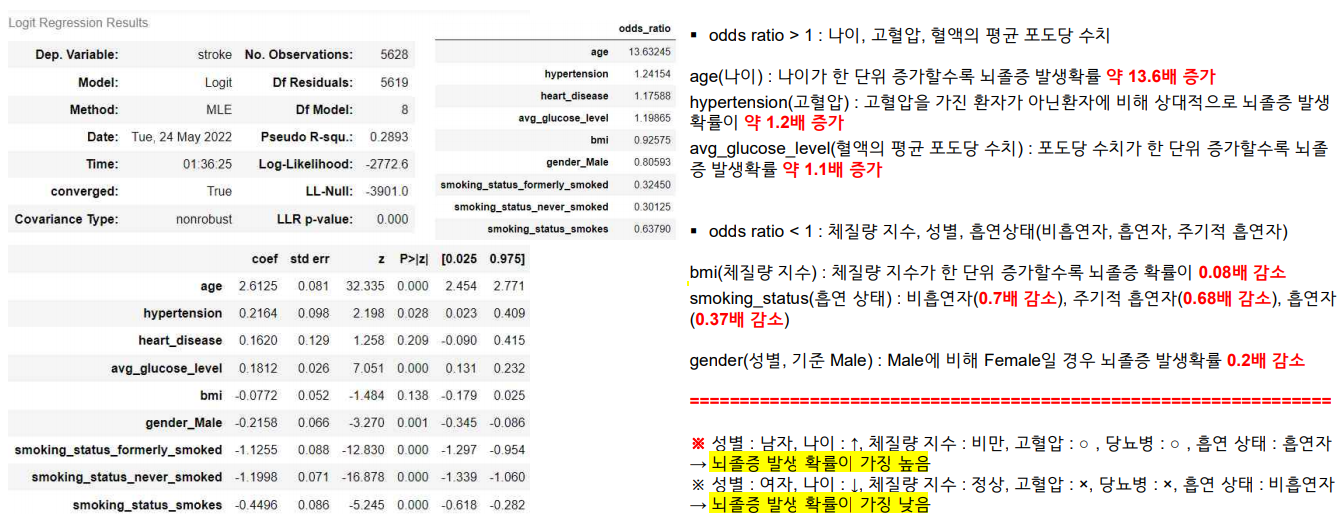
→ 모델에서 공통적으로 age, avg_glucose_level, bmi가 중요한 변수로 도출되었으며, 나이, 포도당 수치, 체질량 지수와 같이 생활습관과 관련된 변수들이 뇌졸증 발생 여부와 밀접하게 관련됨을 확인하였으며, 이외에도 공통으로 확인된 생활습관 변수로는 흡연 여부가 존재
→ EDA에서는 지병과 관련된 hypertension(고혈압), heart_disease(심장병)의 변수가 중요 변수로 선택되었으나, 해당 데이터 셋에서는 상대적으로 뇌졸증과 큰 관련성이 없음
→ 결론적으로 뇌졸증 발생 여부의 경우 환자가 가지고 있는 지병의 영향보다는 생활습관이나 자연현상과 요인들이 밀접한 관련성이 있음
Decision Tree Classifier : age(나이), bmi(체질량 지수), avg_glucose_level(혈액의 평균 포도당 수치), smoking_status(흡연 여부)
Random Forest : age(나이), bmi(체질량 지수), avg_glucose_level(혈액의 평균 포도당 수치), smoking_status(흡연 여부)
→ 모델에서 공통적으로 age, avg_glucose_level, bmi가 중요한 변수로 도출되었으며, 나이, 포도당 수치, 체질량 지수와 같이 생활습관과 관련된 변수들이 뇌졸증 발생 여부와 밀접하게 관련됨을 확인하였으며, 이외에도 공통으로 확인된 생활습관 변수로는 흡연 여부가 존재
→ EDA에서는 지병과 관련된 hypertension(고혈압), heart_disease(심장병)의 변수가 중요 변수로 선택되었으나, 해당 데이터 셋에서는 상대적으로 뇌졸증과 큰 관련성이 없음
→ 결론적으로 뇌졸증 발생 여부의 경우 환자가 가지고 있는 지병의 영향보다는 생활습관이나 자연현상과 요인들이 밀접한 관련성이 있음
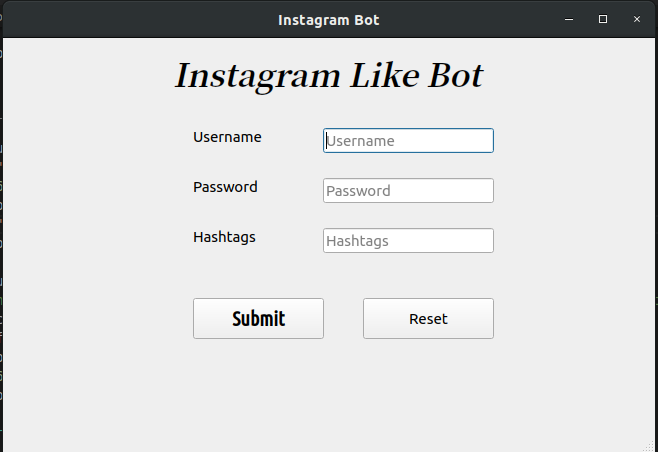
A simple Instagram like bot that likes posts based on the hashtags you provide. Helps with getting back likes and gaining followers who share the same interests as you.
I’ve chosen to go with a minimalistic UI.
Run pip install -r requirements.txt in your shell.
Requirements:
Python 3.6 or higher
PyQt5, for building/editing the UI sudo apt-get install qt5-default
webdriverdownloader, for downloading geckodriver for Firefox. You’re free to use any browser, but you’ll have to make the appropriate changes in main.py.
Usage
Run main.py.
The UI will open up. Enter all the inputs. Rest assured, your password is safe.
Click on the ‘Submit’ button and wait a few seconds.
Sit back and watch how the bot goes.
Contributing
Here’s how you can contribute to the project:
Help with building the Android app. The debug version has been put up as a release, but it crashes every time I try to load the app.
Esta aplicação tem por finalidade fazer uma consulta pegar as informações de determinado userID e publicá-las com o amazon sqs em filas de mensagens que ficam esperando esperando processamento.
Dentro do projeto onde se encontra o arquivo docker-compose.yml rode o comando do docker para subir as configuraçoes do localstack:
docker-compose up
Estes dois comandos abaixo servem para forçar a deletar imagens ou containers do docker que possam causar conflito
Comando do docker-compose para limpar os containers
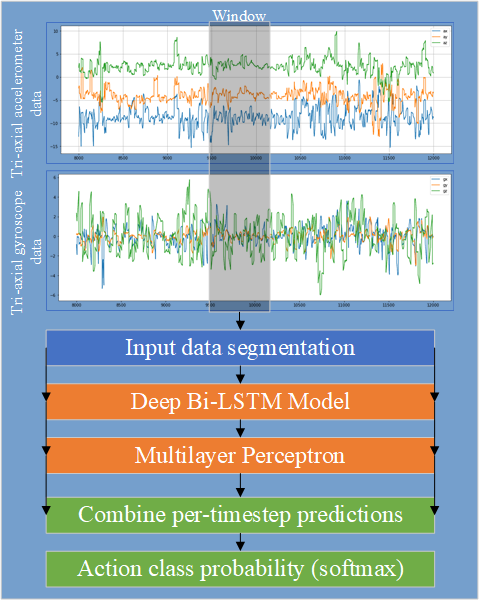
Sensor Based Human Action Recognition using Smartwatch
Simple sensor based human action recognition end-to-end pipeline using Bi-LSTM model. We collect the dataset using our own smartwatch wear os sensor data collecter as you can check here. Our dataset consists of accelerometer and gyroscope from smartwatch data with the action of Walking, Standing, Jumping, and Falling, you can make and use your own dataset as well.
Dependencies
Tensorflow 1.14
Method
Human action recognition for wearable sensor data is conduct by using bidirectional long-short term memory (Bi-LSTM) to capture the long-term dependencies of hand movement and automate feature extraction from raw sensor inputs and multilayer perceptron as the classifier of each activity classes. In order to train our Bi-LSTM model, we do not perform any hand-crafted feature pre-processing and directly split each collected data into a number of windows. Through the experiment of different window sizes, in our case, we find the optimal window size is about 120 Hz with a step size of 20Hz. The Bi-LSTM learns to map and predict each window sensor data to an activity as shown in figure above.
Deployment
You can save the model as frozen protobuf file and use our action recognition wear os application here .
The purpose of this repo is to serve as a guideline of how to properly use the calibration functions in the @bolderflight MPU9250 library.
Credit also rightfully goes to @GiovanniCmpaner for clarifying how to properly use the calibrateAccel() function. A reference link is provided where the discussion was brought up on how to use the calibrateAccel() function properly.
This repository has two versions of the same code for those who prefer using the Arduino IDE, and for those who prefer using Visual Code with the Platform IO extension.
[PLEASE KEEP IN MIND]
If you’re using the Arduino IDE and the Teensy 4, you’ll have to DECREASE the clock speed by going to :
Tools –> CPU Speed –> 150 Mhz
For some reason if you’re using VS Code with the Platform IO extension, you’ll HAVE to include the following in the platformio.ini file :
monitor_speed = 115200
board_build.f_cpu = 60000000L
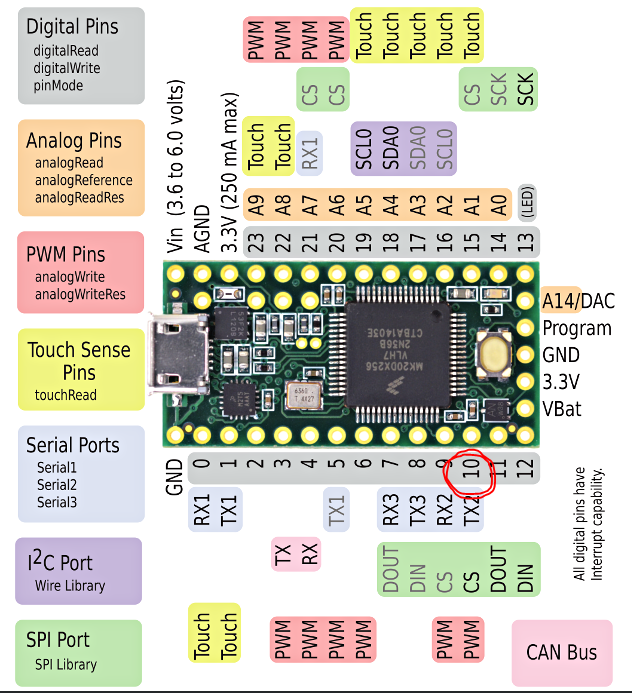
Wire Hook Up
KEEP IN MIND THE MPU9250 IS A 3.3V TOLERANT BREAKOUT BOARD
The wiring table below was based on the pinout from a Teensy 4 board.
MPU Breakout Board Pin
Teensy Pin
Function
VCC
3.3 V
Power
GND
GND
Common Ground
SCL/SCLK
13
I2C Serial Clock / SPI Serial Clock Pin
SDA/SDI
11
I2C Serial Data / SPI Serial Data Pin
EDA
N/A
I2C Serial Data Input
ECL
N/A
I2C Master Serial Clock
ADO/SDO
12
I2C Address / Serial Data Out Pin
INT
GND
Interrupt Pin
NCS (CS)
10
Chip Selection Pin
FSYNC
GND
Frame Synchronisation Input Pin
The SPI communication protocol was used between the Teensy board and the MPU 9250.
NCS is just a different way of notating that particular pin on the MPU 9250 is the Chip Select (CS) pin.
When the NCS/CS pin recieves a LOW signal from the Teensy, communication between the two devices is initialized and the IMU data is sent TO the Teensy board.
If multiple MPU 9250’s were to be used (Or any sensor that’s using SPI in general), the NCS/CS pins from each MPU 9250 would have to be ‘attached’ to a different digital pin on the Teensy.
Specifying the digital pin to be used to send the LOW signal to the MPU 9250 is done through the SPI object declaration, which by “default” in this program is pin 10 as shown in the code snippet below.
MPU9250 IMU(SPI, 10);
The other pins such as the SCL,SDA,ADO can be attached to the same breadboard nodes with the other MPU 9250’s
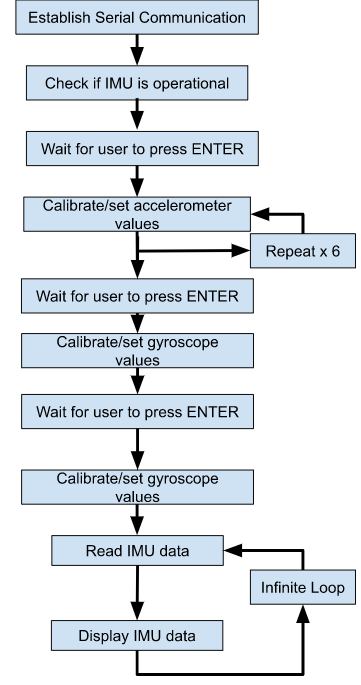
Overview of calibration program
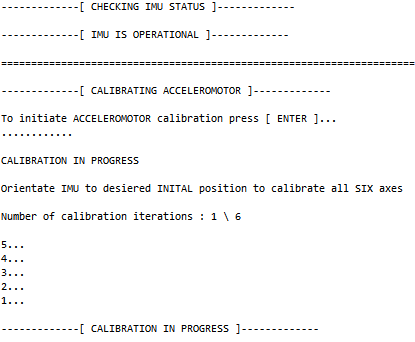
A series of print statements are used throughout the program to notify the user where they are in the calibration process.
After serial communication is established, the function IMU.begin() should return TRUE if nothing is wrong, which if that’s the case, the serial monitor or terminal you’re using will prompt the user to press ENTER to start calibrating the acceleromotor.
Overview of calibration functions
IMU.calibrateAccel();
Calibrating the acceleromotor involves placing the sensor in six different stationary positions similar when looking at the six different faces of a single dice.
After pressing ENTER a countdown will start.
Once the calibration for that iteration is done, the user will be prompted to change the sensor orientation and notified which iteration (out of 6) they’re on.
After all six iterations are done, the user will be prompted both the bias and scale factors which are then applied.
IMU.calibrateGyro();
The user will be prompted again to press ENTER to initiate the gyroscopic calibration (which happens A LOT faster and is only done once).
Once the gyro calibratoin is done, both the gyro scale and bias factors will be applied to the sensor.
IMU.calibrate();
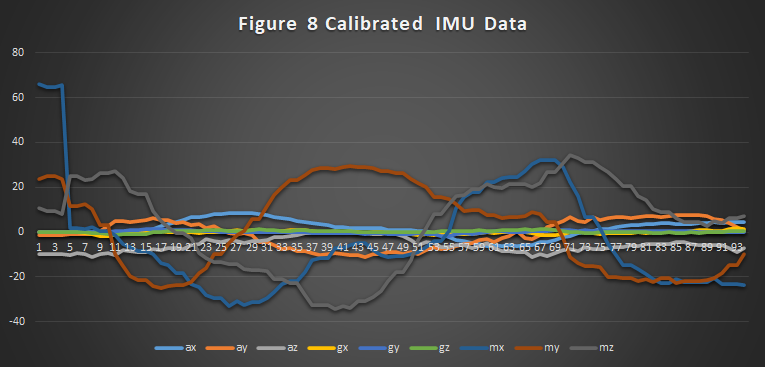
During the magnetometer calibration, the MPU 9250 MUST be continuously and slowly moved in a figure 8 motion.
Once enough data is collected, both the bias and scale factors for the magnetometer will then be applied.
Pictured below is a high level diagram of what’s going on while the program is running.
Repository Folder Contents
In the Basic_IMU_Ouput folder are two subfolders:
Basic_IMU_Output_Arduino
Basic_IMU_Output_Arduino_VS_Code
The main purpose of these programs is to provide a quick way to check if your SPI wiring is correct.
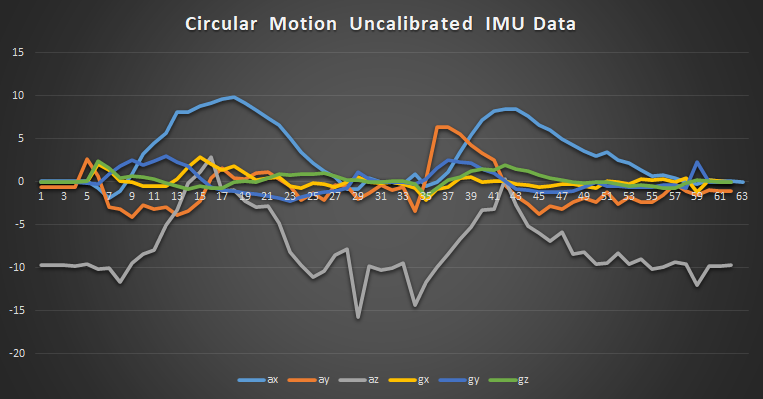
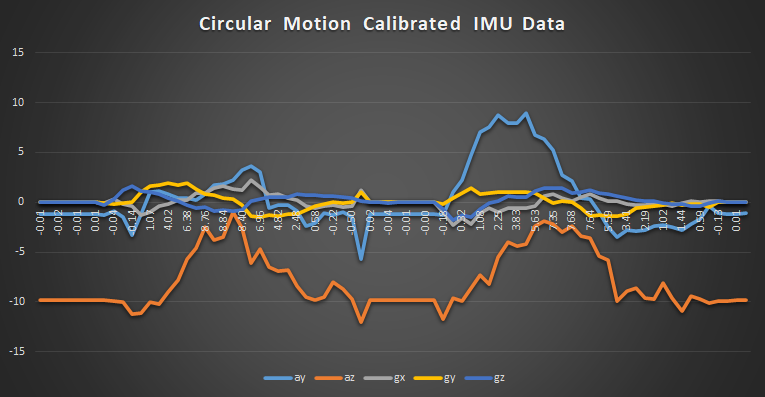
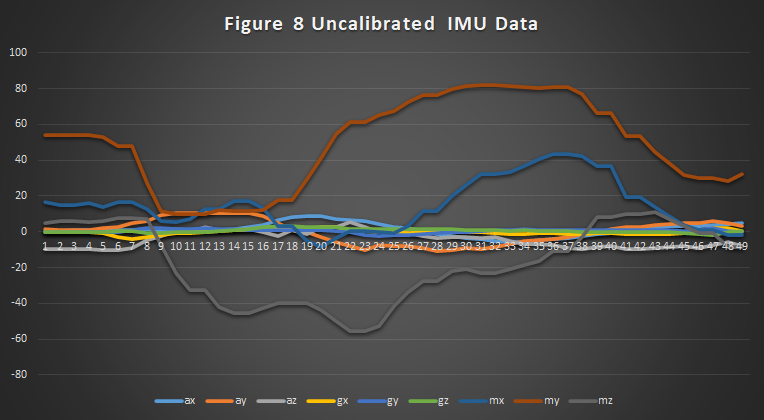
So…Did the calibration even worked?
Looking at the output data alone, it’s extremely hard to tell if the calibration worked or not.
So to determine if it did or not, I :
Uploaded either the Basic_IMU_Output_Arduino/Basic_IMU_Output_VS_Code to the Teensy.
Took the MPU 9250 and made circular/figure 8 motions/movements as shown in the gif below.
Took the uncalibrated gryoscopic/acceleromotor/magnetometer data that was displayed on the serial monitor/terminal copy and pasted the values into a txt file.
Imported the data from the txt to an Excel spreadsheet.
Created a line graph with the data provided.
Repeated the same steps with after calibrating the MPU 9250.
And the results were as followed.
Conclusion
Judging by the generated Excel sheets along with my limited knowledge and experience with Internal Measurement Units (IMUs) like the MPU 9250, it’s extremely hard to tell if the calibration is working or not.
But circling back to my original point of creating this repository was to provide a guide/framework for those who are using bolderflight’s library and whatever IMU/MPU sensor the user has on hand.
As a academically trained Biomedical engineer, for those who have comments/suggestions/corrections, I would love to hear back from y’all as I’m still learning alot myself as I dive deeper into the Embedded engineering world.
The purpose of this repo is to serve as a guideline of how to properly use the calibration functions in the @bolderflight MPU9250 library.
Credit also rightfully goes to @GiovanniCmpaner for clarifying how to properly use the calibrateAccel() function. A reference link is provided where the discussion was brought up on how to use the calibrateAccel() function properly.
This repository has two versions of the same code for those who prefer using the Arduino IDE, and for those who prefer using Visual Code with the Platform IO extension.
[PLEASE KEEP IN MIND]
If you’re using the Arduino IDE and the Teensy 4, you’ll have to DECREASE the clock speed by going to :
Tools –> CPU Speed –> 150 Mhz
For some reason if you’re using VS Code with the Platform IO extension, you’ll HAVE to include the following in the platformio.ini file :
monitor_speed = 115200
board_build.f_cpu = 60000000L
Wire Hook Up
KEEP IN MIND THE MPU9250 IS A 3.3V TOLERANT BREAKOUT BOARD
The wiring table below was based on the pinout from a Teensy 4 board.
MPU Breakout Board Pin
Teensy Pin
Function
VCC
3.3 V
Power
GND
GND
Common Ground
SCL/SCLK
13
I2C Serial Clock / SPI Serial Clock Pin
SDA/SDI
11
I2C Serial Data / SPI Serial Data Pin
EDA
N/A
I2C Serial Data Input
ECL
N/A
I2C Master Serial Clock
ADO/SDO
12
I2C Address / Serial Data Out Pin
INT
GND
Interrupt Pin
NCS (CS)
10
Chip Selection Pin
FSYNC
GND
Frame Synchronisation Input Pin
The SPI communication protocol was used between the Teensy board and the MPU 9250.
NCS is just a different way of notating that particular pin on the MPU 9250 is the Chip Select (CS) pin.
When the NCS/CS pin recieves a LOW signal from the Teensy, communication between the two devices is initialized and the IMU data is sent TO the Teensy board.
If multiple MPU 9250’s were to be used (Or any sensor that’s using SPI in general), the NCS/CS pins from each MPU 9250 would have to be ‘attached’ to a different digital pin on the Teensy.
Specifying the digital pin to be used to send the LOW signal to the MPU 9250 is done through the SPI object declaration, which by “default” in this program is pin 10 as shown in the code snippet below.
MPU9250 IMU(SPI, 10);
The other pins such as the SCL,SDA,ADO can be attached to the same breadboard nodes with the other MPU 9250’s
Overview of calibration program
A series of print statements are used throughout the program to notify the user where they are in the calibration process.
After serial communication is established, the function IMU.begin() should return TRUE if nothing is wrong, which if that’s the case, the serial monitor or terminal you’re using will prompt the user to press ENTER to start calibrating the acceleromotor.
Overview of calibration functions
IMU.calibrateAccel();
Calibrating the acceleromotor involves placing the sensor in six different stationary positions similar when looking at the six different faces of a single dice.
After pressing ENTER a countdown will start.
Once the calibration for that iteration is done, the user will be prompted to change the sensor orientation and notified which iteration (out of 6) they’re on.
After all six iterations are done, the user will be prompted both the bias and scale factors which are then applied.
IMU.calibrateGyro();
The user will be prompted again to press ENTER to initiate the gyroscopic calibration (which happens A LOT faster and is only done once).
Once the gyro calibratoin is done, both the gyro scale and bias factors will be applied to the sensor.
IMU.calibrate();
During the magnetometer calibration, the MPU 9250 MUST be continuously and slowly moved in a figure 8 motion.
Once enough data is collected, both the bias and scale factors for the magnetometer will then be applied.
Pictured below is a high level diagram of what’s going on while the program is running.
Repository Folder Contents
In the Basic_IMU_Ouput folder are two subfolders:
Basic_IMU_Output_Arduino
Basic_IMU_Output_Arduino_VS_Code
The main purpose of these programs is to provide a quick way to check if your SPI wiring is correct.
So…Did the calibration even worked?
Looking at the output data alone, it’s extremely hard to tell if the calibration worked or not.
So to determine if it did or not, I :
Uploaded either the Basic_IMU_Output_Arduino/Basic_IMU_Output_VS_Code to the Teensy.
Took the MPU 9250 and made circular/figure 8 motions/movements as shown in the gif below.
Took the uncalibrated gryoscopic/acceleromotor/magnetometer data that was displayed on the serial monitor/terminal copy and pasted the values into a txt file.
Imported the data from the txt to an Excel spreadsheet.
Created a line graph with the data provided.
Repeated the same steps with after calibrating the MPU 9250.
And the results were as followed.
Conclusion
Judging by the generated Excel sheets along with my limited knowledge and experience with Internal Measurement Units (IMUs) like the MPU 9250, it’s extremely hard to tell if the calibration is working or not.
But circling back to my original point of creating this repository was to provide a guide/framework for those who are using bolderflight’s library and whatever IMU/MPU sensor the user has on hand.
As a academically trained Biomedical engineer, for those who have comments/suggestions/corrections, I would love to hear back from y’all as I’m still learning alot myself as I dive deeper into the Embedded engineering world.
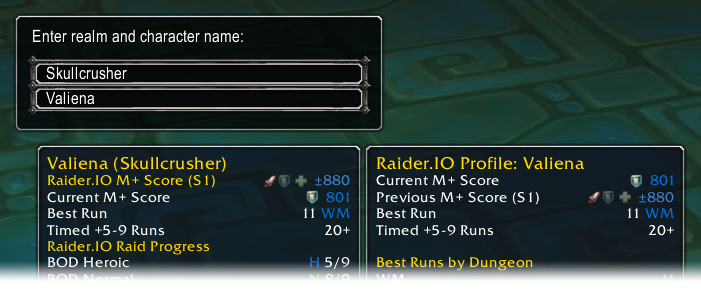
This is a companion addon to go along with the Raiding, Recruitment, and Mythic+ Rankings site, Raider.IO: https://raider.io. With this addon installed, you’ll gain access to an easy way to view Mythic Keystone scores, Raid Progress, and Recruitment status for players– all without leaving the game!
Overview
Simply hover over a player with your mouse, your guild roster, or even the Group Finder list where you see queued people; if they meet the minimum qualifications then you’ll see their score and best run in the tooltip.
Additionally, you can right-click players from the standard target unit frame to Copy Raider.IO URL and then easily look up their full profile on the site. With this functionality you can directly paste these URLs anywhere on Raider.IO to navigate to that player’s profile page.
Recruitment
With the Raider.IO Recruitment features you can now also see whether a player is looking for a guild/team, or if they are recruiting for their own guild/team. This will show up as a line in the tooltip as follows:
You can right click on any player that is recruiting and hit Copy Recruitment URL to copy a URL that you can paste into your browser to view more details of the recruitment profile.
Because recruitment information can change regularly, we encourage people to use the Raider.IO Desktop Client to keep this data in sync.
If you have run into any problems, check out our FAQ at https://raider.io/faq, or join us on Discord at: https://discord.gg/raider in #addon-discussions — we always have people around willing to help.
Getting Started
The easiest way to get started is to use the RaiderIO Desktop Client: https://raider.io/addon
Once installed you can load into the game and you will start seeing Mythic+, Raiding, and Recruitment details on players around you. This AddOn works by storing a snapshot of character data from Raider.IO and then using that to populate information on qualified players.
To qualify for inclusion in a snapshot, players must meet specific criteria based on the type of data:
Mythic Plus
Have earned at least 200 points in the current or previous season. Honored and higher patrons do not have a minimum score requirement in order to be shown in the addon.
Have logged in to the game within the past 14 days
Raiding
Have defeated at least 30% of the bosses (rounded up) in either Normal, Heroic, or Mythic
Recruitment
All active and public recruitment profiles are available in-game
Remember: We update the addon with the latest scores and top runs multiple times each day. Update regularly to ensure you are seeing the freshest information. Using the RaiderIO Desktop Client you can keep your addon updated automatically!
Detailed Addon Usage
Our intent with this AddOn is to provide an easy way for people to get some information at a glance when forming groups. There is no substitute for talking with your fellow players, so be a pal and listen if an applicant whispers you. These are the fields we show, and when we show them:
Character Raid & Mythic+ Tooltips
Raid information in tooltips simply lists the best progress seen for the player.
Mythic+ tooltips have a lot of parts to them:
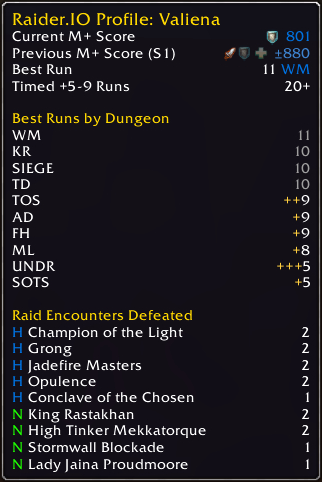
Raider.IO M+ Score: This is the overall score for this character. If the score is from a previous season, then the value of the score is rounded to the nearest 10s, and is prefixed with ±. You can also identify the previous season score by looking for the (S#) suffix on the tooltip headline.
Best Run: This will indicate the Mythic+ level for the player’s best scoring run, along with the specific dungeon. Up to three plus signs + will be prefixed to the keystone level to indicate how much the keystone was upgraded during that run. Note: when this keyword is highlighted green it means that the player’s Best For Dungeon is also the same as their overall Best Run.
Best For Dungeon: You’ll see this line when using LFD to form or join a Keystone group. This will show the Mythic+ level of the player’s best scoring run for the chosen dungeon.
Timed #+ Runs: These lines indicate how many M+ runs have been completed by this player within the timer over the course of the current season. The player’s two highest categories of Timed Runs will show by default.
Main's Best M+ Score / Main's Current M+ Score: This indicates the best character score on this player’s account, if they have registered on Raider.IO and linked their Battle.Net account. This will only show if the Main’s Score is greater than the current character’s score. If someone has a good score on their main, then much of their prior experience will help them perform better in dungeons while on their alt.
Role icons included on Mythic+ tooltips can be thought of as badges earned by accumulating certain amounts of score while playing as that role. Fully opaque icons indicate they’ve earned at least 80% of their overall score in that role. Semi-transparent role icons indicate they have earned at least 40% of their overall score in that role.
Recruitment Tooltips
We currently determine the profile to show based on a priority order for the entity and activity type. Our overall rationale is that we want the most common organized activities to take precedence when choosing what to show in-game.
Guild + Raiding (only recruiters)
Guild + Guild Mythic+ (only recruiters)
Team + Team Mythic+ (only recruiters)
Character + Raiding
Character + Guild Mythic+
Character + Team Mythic+
Guild + Guild PVP (only recruiters)
Guild + Guild Social (only recruiters)
Character + Guild PVP
Character + Guild Social
Note: Anyone in your guild who has access to the Recruitment information will show your group’s recruitment profiles in-game. Meaning, it is based on the roles given to each rank. These ranks will show the tooltip in game, and will also be able to access recruitment information on the site:
GM / Captain
Officer
Recruiter
Character Profile Tooltips
You can view your personal M+ and Raid Progress profile when you open the Dungeon Finder. This will be shown as a large tooltip alongside the Dungeon Finder frame with additional details about your per-dungeon performance.
This can be used to help understand what dungeons you should try to focus on in order to raise your score.
By default when you are in the Dungeon Finder it will show your own profile. However, you can press a modifier key (Shift/Alt/Ctrl/Cmd) to show the target character’s full profile instead. There is also a config option to invert this behavior.
Keystone Tooltips
You can view additional details when hovering over Mythic+ Keystone items, such as:
The highest key completed for each member of your group for the dungeon you are in, or queued for.
Avg. Timed +# Player Score: This is the rounded median score of players who have successfully completed Mythic+ runs in time at this level. This data is sampled from the past 60 days of runs tracked on Raider.IO, and it excludes the top and bottom 1% of scores at each level. This is intended to provide a guide for the type of score you might consider when forming or joining a group based on data seen across all players.
Group Search
You can pull up detailed information for all the characters in your group at once by utilizing the Raider.IO Group Search feature.
Click the magnifying glass icon at the bottom of the Dungeon Finder
Copy the text in the window that pops up
Go to https://raider.io and hit Ctrl-V or Cmd-V to paste this while the site is in the foreground.
This will then take you to the Raider.IO Advanced Search page for all the characters in your group.
Copy Character Raider.IO URL
Click the “Copy Raider.IO URL” button
Copy the text in the window that pops up
Go to https://raider.io and hit Ctrl-V or Cmd-V to paste this while the site is in the foreground.
This will take you to that character’s profile page.
In-Game Character Search (Advanced)
You can look up any character in the current database by using the /rio search command.
When you type this, you will be presented with a small frame where you can enter the realm name and character name to search for. If they are found, then their information will be pulled up and displayed.
You can type /rio search to hide the window.
Configuring the AddOn
Our recommended settings are enabled by default, but we’ve provided several options to customize how and where the tooltips might show while in-game. Type /raiderio to open the Raider.IO options frame. Alternatively, you can also find a shortcut in the Interface > AddOn settings frame.
Here you can easily enable or disable various features, including whether to show scores from each faction, and various tooltip customization options.
Remember to click “Save” to save the changes, or “Cancel” to abort and close the dialog.
Score Color Tiers
Scores map to a specific color based on their range. We’ve followed the standard WoW quality colors, but added additional gradients between the base values to provide more brackets to ascend through. These tiers are recalculated based on actual scores.
Patreon Rewards
Interested in supporting development of Raider.IO and getting some rewards while you’re at it? We offer multiple levels of rewards.
Friendly:
Browse Raider.IO AD-FREE!
Friendly Patron rank in Discord
Honored:
Exclusive profile header background options
Minimum score requirement removed from addon
Elevated queue priority
Honored Patron rank in Discord
Plus all rewards from Friendly tier
Revered:
Desktop client updates scores 4 times a day
Custom Vanity URL for your guild or character
Queue priority elevated above Honored level
Revered Patron rank in Discord
Plus all rewards from Friendly and Honored tiers
Exalted:
Desktop client updates scores 8 times a day
Utilize up to 2 Custom Vanity URLs
Queue priority elevated above Revered level
Automatically qualify for all locked header backgrounds
Exalted Patron rank in Discord
Plus all rewards from Friendly, Honored, and Revered tiers
Developer API
We love our fellow developers! We wanted to provide anyone in the community a simple way to tap into the scores that are a part of this addon. Addon developers can do this by utilizing the RaiderIO table to access certain APIs we provide.
If the documentation is out-of-date you can also get a lot of information straight from the source code. A lot of the functionality is annotated for the sake of the lua language server extension in vscode.
RaiderIO.GetProfile
These functions return nil or a RaiderIOProfile table.
This table contains data depending on what providers are loaded. This documentation is not complete, there are several internal values but they are all based on the core data that is documented below.
{
  hasRenderableData = boolean - if false pretend the table was nil instead (the database is outdated so we don't want to show inaccurate data)
  currentRoleOrdinalIndex = number
  currentScore = number
  fortifiedDungeons = number[]
  fortifiedDungeonTimes = number[]
  fortifiedDungeonUpgrades = number[]
  fortifiedMaxDungeon = RaiderIOMythicKeystoneDungeon
  fortifiedMaxDungeonIndex = number
  fortifiedMaxDungeonLevel = number
  keystoneFifteenPlus = number
  keystoneFivePlus = number
  keystoneTenPlus = number
  keystoneTwentyPlus = number
  mainCurrentRoleOrdinalIndex = number
  mainCurrentScore = number | nil
  mainPreviousRoleOrdinalIndex = number
  mainPreviousScore = number | nil
  mainPreviousScoreSeason = number
  mplusCurrent = RaiderIOMythicKeystoneRoleInfo
  mplusMainCurrent = RaiderIOMythicKeystoneRoleInfo
  mplusMainPrevious = RaiderIOMythicKeystoneRoleInfo
  mplusPrevious = RaiderIOMythicKeystoneRoleInfo
  previousRoleOrdinalIndex = number
  previousScore = number
  previousScoreSeason = number
  sortedDungeons = RaiderIOMythicKeystoneDungeonProfile[]
  sortedMilestones = Milestone[]
  tyrannicalDungeons = number[]
  tyrannicalDungeonTimes = number[]
  tyrannicalDungeonUpgrades = number[]
  tyrannicalMaxDungeon = RaiderIOMythicKeystoneDungeon
  tyrannicalMaxDungeonIndex = number
  tyrannicalMaxDungeonLevel = number
  -- metatable data dynamically assigned depending on the weekly affix
  dungeons = number[]
  dungeonTimes = number[]
  dungeonUpgrades = number[]
  maxDungeon = RaiderIOMythicKeystoneDungeon
  maxDungeonIndex = number
  maxDungeonLevel = number
}
RaiderIOMythicKeystoneDungeonProfile
{
  dungeon = RaiderIOMythicKeystoneDungeon
  level = number
  chests = 0 | 1 | 2 | 3
  fractionalTime = number - between 0.0 and 1.0
}
RaiderIOMythicKeystoneDungeon
{
  index = number
  id = number
  instance_map_id = number
  keystone_instance = number
  lfd_activity_ids = number[]
  name = string
  shortName = string
  shortNameLocale = string
  timers = number[]
}
{
  roles = RaiderIOMythicKeystoneRole[]
  score = number
  season = number | nil
}
RaiderIORaidProfile
{
  hasRenderableData = boolean - if false pretend the table was nil instead (the database is outdated so we don't want to show inaccurate data)
  progress = RaiderIORaidProfileProgress[]
  previousProgress = RaiderIORaidProfileProgress[]
  sortedProgress = RaiderIORaidProfileSortedProgress[]
  raidProgress = RaiderIORaidProfileRaidProgress[]
}
{
  count = number
  difficulty = number
  killed = boolean
}
RaiderIORaidProfileRaidProgress
{
  current = boolean
  fated = string
  progress = RaiderIORaidProfileRaidProgressInfo
  progressCount = number
  raid = RaiderIORaidProfileRaid
  show = boolean
}
RaiderIORaidProfileRaidDungeon
{
  index = number
  id = number
  instance_map_id = number
  lfd_activity_ids = number[]
  name = string
  shortName = string
  shortNameLocale = string
}
RaiderIORaidProfileRaid
{
  dungeon = RaiderIORaidProfileRaidDungeon
  id = number
  mapId = number
  name = string
  shortName = string
  bossCount = number
  ordinal = number
}
RaiderIORecruitmentProfile
{
  hasRenderableData = boolean - if false pretend the table was nil instead (the database is outdated so we don't want to show inaccurate data)
  entityType = number
  title = string[] - this locale key will yield the actual label from the locale table
  titleIndex = number
  tank = boolean
  healer = boolean
  dps = boolean
}
RaiderIO.ShowProfile
Updates a tooltip widget and appends the character profile just like how RaiderIO does to the regular tooltips. This function uses the same arguments as RaiderIO.GetProfile except the first is the tooltip widget.
RaiderIO.ShowProfile(tooltip, ...) => true | false - depending on if the tooltip was altered or not
RaiderIO.GetScoreColor
Returns the colors for a given score.
RaiderIO.GetScoreColor(score) => red, green, blue - in the range of 0.0 to 1.0
Deprecated
Please refrain from using these API as they will be removed in future updates.
The first app for 12 and 4 hole ocarinas that just happens to be 100% free and open-source!
Inspiration
While there are a lot of apps that do 4-hole ocarinas, 12-hole ocarinas have been left out in the dust. Luckily, we’re here to change that!
What it does
Our app emulates both 12 and 4 hole ocarinas, with plans to expand into 6 and 10 hole ocarinas in the future! Simply put your fingers on the screen, or in the case with the 12 and 10- hole ocarinas, put both thumbs on the volume buttons while pressing the rest of your fingers on the screen!
How we built it
We used Android Studio 3.0.0 to build a native Android app from scratch.
Challenges we ran into
Having never used Android Studio before, learning the ins and outs of Android on the spot was a bit difficult. In addition, we had to come up with manual implementations for several integral functions, such as sound production, that Android’s base SDK didn’t support.
Accomplishments that we’re proud of
While it was bumpy along the way, we managed to ship a working demo of FOSScarina with support for 4 and 12-hole ocarinas. This involved many different elements, such as sound production and the use of multiple fragments.
What we learned
Our crash-course in Android development!
What’s next for FOSScarina
Stay tuned to FOSScarina’s plans to expand into 6 and 10 hole ocarinas in the future!


 https://github.com/shinho123/Data-mining-project—stroke-prediction